Onion Smash Burger - double onion cheeseburger

Onion Smash Burgers

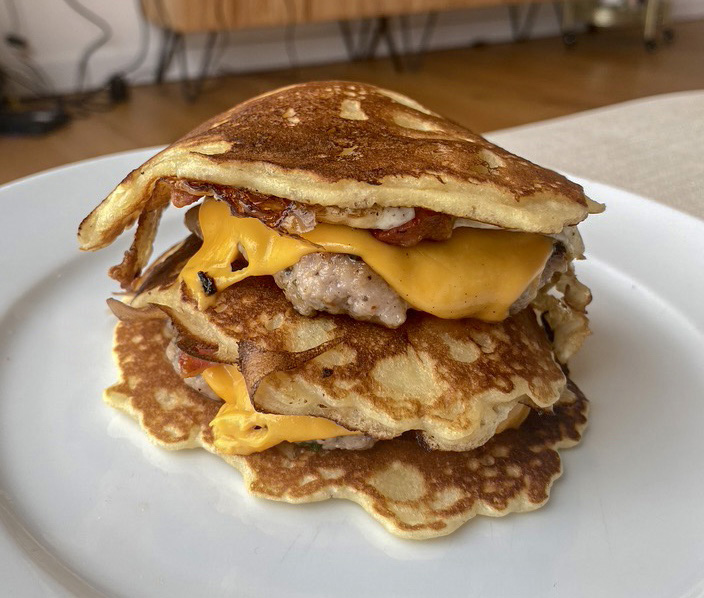
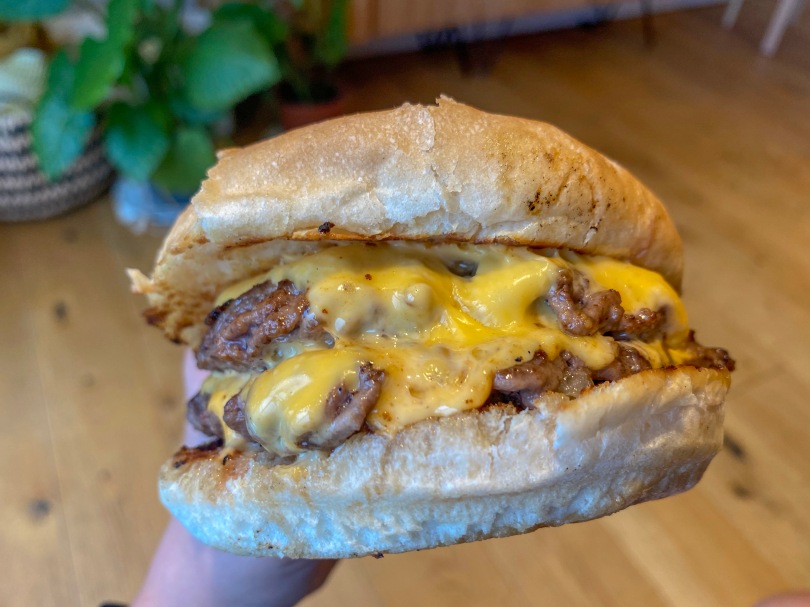
I love burgers. 95% of the time I get a Deliveroo it’ll be Bleecker, Burger & Beyond, Salt Shed, Black Bear or Shake Shack. But, despite my deep love of burgers, I’ve never mastered making my own – until now. And let me tell you, making an incredible burger could not be more simple. It all comes down to the meat you use – the quality and the fat content. This burger itself is literally just salt & minced beef, so as you could imagine you really want a delicious, high quality mince to bring the flavour. The other thing you need is at least 20% fat – this will bring with it yet more flavour and juiciness. The rest of the toppings are up to you & how you like to eat your burgers. I like mine super simple – onions and American cheese. I don’t like to overpower that delicious patty.

These burgers were inspired by a recent trip to the George Motz x Bleecker burger pop-up. This was his 1 UK stop on his burger tour and my friend Ros & I were lucky enough to get one (after a 3 hour queue, and I would do it again). Motz did smash burgers with onions – you make these but putting a ball of meat on the grill, sprinkling on some raw, sliced, white onion, seasoning it and smashing it down using a spatula. Smash burgers are meant to be thin with slightly rugged and crispy edges – but they’re still juicy af in the middle. I never thought I’d be able to make a burger that came close to the ones I order but this recipe will get you pretty damn close! The burgers are crisp on the edges, but so juicy in the middle. The cheese melts & mixes in with the fat and the bread soaks up any drippage. And did I mention they literally take under 15 mins to coo? Yeah, you have to try these.


Onion Smash Burgers

Serves 2 | Cooks in 15 mins

Ingredients

320-360g high quality 20% fat mince meat

4 slices American cheese

2 burger buns

1/2 white onion, thinly sliced into half moons

Veg oil & butter for cooking

Salt for seasoning

Method

  1. Divide your meat into 80-90g portions and roll into a ball.
  2. Melt a knob of butter in a cast iron pan over medium high heat. Add the buns cut side down and toast until lightly golden. Set these aside
  3. Wipe out the pan to get rid of any bread crumbs, coat the bottom of the pan in veg oil and turn the heat to medium high.
  4. Once the pan is very hot, add a ball of mince meat. You’ll need to work very quickly – season very generously with salt, and top with a quarter of the sliced onion. Place a wide metal spatula on top of the ball, and press down using the end of another spatula. You want your meat to be <1cm thick – we want crispy edges!
  5. Cook on one side for 1-2 mins until the meat is caramelised and a little crispy. Flip the patty and add the cheese on top. Cook for another 1-2 mins until the cheese is melted, the bottom of the patty is caramelised and the onions have taken on some colour.
  6. Repeat this for the remaining 3 patties.
  7. Stack 2 patties per bun & serve with your choice of sauce/pickles. Let me know in the comments how you have your burgers!
Sausage Egg & Cheese American Pancake Stack

Sausage, Egg And Cheese Pancake Stack

This is a dirty but delicious breakfast/brunch recipe – absolutely nothing refined about it. That makes it another great option for a hangover breakfast, like my best ever breakfast muffin recipe. In fact, the two recipes are pretty similar but this swaps the muffin for American pancakes, and doubles up on patty count. It’s cheesy, salty, carby, and super tasty owing to seasoning of that sausage patty. I like to use American cheese for this as, for some reason, I think it’s delicious but feel free to swap it for something a little higher quality. I just love the creamy texture of American cheese. The beauty of this recipe is you can pretty much add whatever you’d normally have in a breakfast sandwich or whatever you’ve got in your fridge – bacon, hash browns, avocado – the list is endless! Let me know in the comments what combos you try. I’m always looking for new variations!


Sausage, Egg And Cheese Pancake Stack

Serves 2 | 40 mins prep + cooking

Ingredients

2/3 batch BBC Good Food American pancake recipe (or equivalent amount of your fave recipe)

3x breakfast patty ingredients from my breakfast muffin recipe

4 slices American cheese (or cheese of your choice)

2 eggs

Maple syrup to serve

Method:

  1. Make the pancake batter. Heat a small amount of butter and oil in a pan over medium heat – you want just enough to cover the bottom of the pan but very little excess.
  2. Once hot, add a large spoonful of your pancake mix to the pan aiming for ~10cm diameter. Cook on one side until bubbles start to form in the mix and it’s started to set on top, it should also be golden brown on the bottom. The cooking time is really dependent on your pan and hob. Flip and cook on the other side until golden brown. Cover in foil & keep in the over at a low temperature to keep warm. Repeat with the remaining batter, re-oiling the pan as needed.
  3. Next, combine all the sausage patty ingredients in a bowl and mix until combined. Form the mix into 4 thin patties, slightly larger in diameter than the pancakes as this will shrink when cooked.
  4. Coat the bottom of a skillet or frying pan with vegetable oil and heat over high heat. Once hot, place the patty into the pan and cook for 1-2 mins until the bottom is browned & caramelised – check after 1 min as this will burn quickly if left unattended. Flip the patty and leave for 30-60seconds, then add the cheese on top. Put a lid or plate over the frying pan and leave for another 30-60 seconds until cooked through (no pink left) and the cheese is melty. Cooking time will depend on the patty thickness, the pan and hob. Set aside & cover with foil.
  5. Crack the eggs into the sausage pan still over high heat and cook to your liking. I like mine over easy but still runny.
  6. To serve, place 1 pancake on a plate followed by a sausage patty, the egg, another pancake, another sausage patty and then a final pancake on top. Drizzle with maple syrup and enjoy!
Chilli garlic tomato pappardelle with dressed mozzarella with parm

Garlic, Chilli Tomatoey Pappardelle With Dressed Mozzarella

We’re back, and it’s another pasta recipe (surprise surprise). Can you tell pasta’s my favourite food? This one is a super tomatoey, garlicky and punchy dish. Think arich, garlic, chilli and tomato sauce over pappardelle with a super tasty and fresh seasoned mozzarella on top. This another quick one, perfect for a weekday dinner. The creamy mozzarella really balances out that rich tomato and mild heat from the chilli. If you can get it, I’d recommend going for a high quality buffalo mozzarella for this dish. The mozzarella is served raw so we’re really after high quality ingredients as there’s no hiding. I’m gonna give you fair warning, this is a very garlicky dish (cooked in the sauce and raw with the mozzarella) so I don’t recommend eating this right before a social gathering, unless you’re all eating it.


Garlic, Chilli Tomatoey Pappardelle With Dressed Mozzarella

Sevres 2 | 30-40 mins cook + Prep

Ingredients

1 ball good quality buffalo mozzarella

4 cloves garlic, 1 clove minced and the rest thinly sliced

2 red chillis, deseeded and thinly sliced

Large handful basil minced

Large handful parsley minced

1tsp red wine vinegar

A few good glugs of good quality extra virgin olive oil

1 tin plum tomatoes

180g dried pappardelle

2-3tbsp grated parm + more to serve

Method

  1. Tear the mozzarella into bitesize chunks and place in a bowl. Add the minced garlic, 1/4 of the chilli, a small handful of parsley & basil, red wine vinegar and a good few glugs of olive oil. Season with salt and pepper, stir, cover and chill in the fridge until ready to eat. This can be done a few hours ahead
  2. Heat 2-3 tbsp olive oil in a medium sauce pan over medium/high heat. Add the sliced garlic and the rest of the chilli. Cook, stirring frequently, until the garlic just begins to turn golden and is fragrant (should take around 5 mins, depending on your hob).
  3. Add the tomatoes, and about 1/2 tin of water. Squish the tomatoes with a spoon. Bring this to a boil then lower the temperature and simmer for 20-30 mins until the sauce has thickened.
  4. Add in the rest of the parsley & basil, and the grated parm. Season to taste with salt & pepper.
  5. Cook the pappardelle in heavily salted pasta water until al dente. Reserve a mug of pasta water towards the end of the cooking time. Combine the pasta & sauce, and add some pasta water to reach your desired sauce consistency.
  6. Serve the pasta with the torn mozzarella on top & more parm if you like!
Herby Miso Garlicky Ramen Noodles

Ramen Noodles With Herby Miso Sauce

This is my second spruced-up packet ramen recipe – the first being my miso peanut butter ramen, and both recipes are up there with the best recipes I’ve come up with (IMO anyway). This dish is super simple and cooks in less than 10 minutes but really doesn’t skimp on flavour. It’s such a fresh tasting dish from the herbs and lemon, with a salty, earthy kick from the miso and soy. Using the egg, similar to a carbonara, makes this sauce super creamy but doesn’t make it too heavy. Feel free to include or exclude the bacon to make it veggie, or swap in whatever meat/protein you have lying around. Ramen is one of my favourite things to have as an easy, quick weeknight dinner – and this is a way to really elevate a simple packet of ramen.


Herby Miso Ramen Noodles

Serves 1 | Cook + Prep 10 mins

Ingredients

1 packet your favourite ramen, noodles only (I prefer Chapagetti as the noodles are thicker)

Handful parsley (stalks & leaves)

Handful coriander (stalks & leaves)

1tbsp white miso

Juice 1/4 lemon

1 clove garlic

1tsp soy sauce (+ more to taste)

1 egg

2 rashers streaky bacon (optional)

Chilli oil to serve (optional)

Method

  1. If using, dice the bacon and fry in a frying pan over medium high heat with a splash of oil until crispy. You could sub in other proteins at this point instead of the bacon.
  2. Bring a pan of water to the boil for the noodles
  3. Meanwhile, add the parsley, coriander, miso, lemon, garlic and soy sauce to a blender or food processor. Add the egg to a bowl and beat with a fork
  4. Once the water is boiling, add the noodles & cook to your liking. After 1-2 mins of cooking, add a few tablespoons of noodle water to the blender/food processor and blend until smooth. You want to use the minimum amount of water here – so start with 2-3 tbsp of water and then add more 1tbsp at a time until the mix is able to blend until completely smooth. Combine the blended herb mix with beaten egg with a fork.
  5. Once the noodles are cooked, transfer them to the frying pan with the bacon (or, if not using the bacon, to a new frying pan) over very low heat. Add the herby egg mix and cook over low heat stirring freqently until the sauce thickens enough to coat the noodles and the egg is cooked (think carbonara). The cooking time very much depends on your hob and pan.
  6. Add more soy sauce and salt and pepper to taste.
  7. Serve in a bowl with chilli oil over the top if you like a bit of a kick!
Pasta Puttanesca

Puttanesca (-esque) Sauce

I learnt about this sauce from the Series of Unfortunate Events movie (IYKYK) and I’ve never looked back. Its a super salty, umami, rich tomatoey sauce – it really packs a punch without feeling too heavy. This is such a great go to weeknight dinner, sped up even more by using a frozen batch of my marinara. I always have a stock of this in my freezer as it can be adapted for so many dishes, and having the sauce ready knocks a good 20 mins off cooking times. This is another of my 15 minute pasta dishes where the sauce is prepped & cooked in the time it takes the pasta to cook. I’ve called this puttaensca-esque as I’ve included tuna which the original doesn’t – I love the addition of tuna for some extra fishiness and protein which keeps me fuller longer.


Putanesca (-esque) Sauce

Serves 1 | 15 mins prep + cook

Ingredients

100g fusilli or other short pasta (or 75g if you aren’t very hungry like me 95% of the time)

1 large clove garlic, thinly sliced

3 jarred/tinned anchovy fillets

1/2 tin tuna (drained)

1/4 batch of my marinara sauce

35g black olives roughly chopped

1tbsp capers

Sprinkle of chilli flakes, to taste

Handful parsley finely chopped

Squeeze of lemon to taste

Parmesan to serve

Method

  1. Cook the pasta in a heavily salted pan of water until al dente.
  2. Meanwhile, heat a splash of olive oil in a frying pan over medium high heat. Add the anchovies and fry, stirring often, until they dissolve into the oil.
  3. Add the garlic and frying until golden. Keep a close eye on this as this will burn quickly. Add the tuna and stir until combined
  4. Reduce the heat to low and add the marinara, capers, olives and chilli flakes (if using). Stir until warmed through. If the sauce is too thick at this point, add some pasta water to reach the desired consistency.
  5. Take off the heat, add salt, pepper and lemon juice to taste. Stir through the parsley (reserve some to serve) and set aside.
  6. Once the pasta is cooked, combine with the sauce and serve with the remaining parsley sprinkled on top and some grated parmesan.
Meg's Perfect Spaghetti Carbonara

Meg’s Perfect Carbonara

I would like to say as a disclaimer I am not Italian, and I apologise if this recipe does not represent a traditional carbonara. I am merely a super-fan of the Italian cuisine who happens to have made a delicious carbonara recipe. As a word of warning, this is probably the richest carbonara you will have, owing to the use of an egg and an egg yolk per person, so be prepared to be very full if you make this. This is not your everyday carbonara – you have been warned.

You may find it odd I only use parmesan and no pecorino, but I actually prefer an all parmesan carbonara (again, sorry) – so feel free to half & half pecorino & parmesan if you so wish. The thing I will definitely stick to tradition for is the guanciale. If you can get your hands on it I reaaaally recommend using guanciale. It adds a much deeper flavour than pancetta and really elevates this dish. I get mine from Eataly usually, but I’ve also ordered it from Lina Stores who ship nationwide! This is the product of endless carbonara trial & errors, until I found the perfect egg/egg yolk/cheese etc. balance. I am finally here sharing with you my perfect, foolproof carbonara: the dinner to wow anyone made in under 30 mins.


Meg’s Perfect Carbonara

Serves 2 (hungry people) | 20 mins prep & cooking

Ingredients

200g pasta of your choice (my personal faves include paccheri, rigatoni & linguine)

150g Guanciale chopped into chunks (or pancetta if you can’t get your hands on guanciale, but the guanciale really adds the ‘wow’)

2 whole eggs

2 egg yolks

75g grated parmesan (or half pecorino, half parmesan)

Freshly ground black pepper (you won’t need much if you’re using guanciale)

Method

  1. Cook your pasta in a pot of water salted like the sea for 2-3 mins less than instructed on the packet.
  2. In the meantime, add your guanciale to a cold frying pan and bring up to medium/high heat. This renders out he fat giving you extra crisp and completely not flabby fat (ew). Drain any excess oil and set aside off the heat until the pasta is ready.
  3. Beat your eggs, egg yolks, parmesan and freshly ground pepper until combined. Add 3-6 spoon fulls of pasta water (this depends how loose your like your sauce, 3 spoons will be a drier sauce) to your egg mix one by one, beating the whole time to temper your eggs and help prevent scrambled egg pasta
  4. When the pasta is done, transfer it to your guanciale pan and return to medium heat being sure to reserve the pasta water.
  5. Add a ladle of pasta water to the pan and cook until almost disappeared. Check if your pasta is cooked to your liking, if still a little too firm repeat this stage.
  6. Once the pasta is cooked, take the pan off the heat and add your egg mix to the pan while constantly moving the pasta. Keep tossing the pasta while moving between off the heat & on low heat (this helps you keep more control of the cooking, and stop the eggs scrambling)
  7. Continue this process until the sauce has thickened and clings to the pasta. Exactly when the sauce is done depends on how you like your carbonara, but you need to cook long enough for the eggs to be cooked thoroughly. You can add some extra pasta water here if you want your sauce a little looser.
  8. Serve with extra parm and some freshly cracked black pepper
Garlicky anchovy pasta

Speedy Garlicky Anchovy Pasta

Even when I don’t have much time to cook, I refuse to sacrifice deliciousness. I created this pasta for such situations. I used strong flavours to make it exciting despite its simplicity (think salty, anchovy-y, tomatoey goodness). It uses mostly store cupboard ingredients too so not only is it quick to cook, you might not even need to go to the shop. As the cooking of the pasta is finished off in the sauce, the sauce ends up feeling very luxurious and clings to the pasta. This truly is a speedy dinner as the sauce is cooked in the time it takes the pasta to cook.


Speedy Garlicky Anchovy Pasta

Serves 2

15 mins prep + cooking

Ingredients

150g linguine or spaghetti (or any pasta really, but it works well with a long pasta)

1.5 tbsp olive oil

6 anchovy fillets in oil, roughly chopped

4 garlic cloves thinly sliced (or 2 large cloves)

Juice 1/2 lemon

2 tbsp tomato puree

1 tbsp butter (or more to taste)

4 tbsp grated parmesan (or more to taste, plus extra for serving)

Handful of parsley chopped

Panko breadcrumbs to serve (if you can get your hands on lemon & black pepper breadcrumbs, get those!) see the note for how to make the breadcrumbs a little fancier

Method

  1. Add your pasta to salted boiling water and cook for a few minutes less than the packet says.
  2. Meanwhile, add your oil and anchovies to a frying pan on medium high heat and cook until the achovies dissolve.
  3. Add the sliced garlic and cook until lightly golden
  4. Add the lemon juice to the pan and cook until mostly evaporated.
  5. Add the tomato puree and cook for a few minutes, stirring regularly until the colour darkens slightly. Take off the heat until the pasta is ready.
  6. Once the pasta is cooked, put the frying pan back onto medium high heat and transfer the pasta over being sure to reserve the pasta water. Add 100-200ml of pasta water to the frying pan and bring to a boil, stirring often, until reduced to almost nothing. Repeat this process until the pasta is cooked to your liking.
  7. Take the pan off the heat and add the butter & Parmesan. Stir through and add more butter/Parmesan to your taste. Add the chopped parsley.
  8. Serve with more parm and the breadcrumbs sprinkled over

Note: If you have time, I definitely recommend sprucing up your bread crumbs a little. In a frying pan heat up 1 tbsp oil + 1/2 tbsp butter with 2 minced cloves of garlic. Fry until golden, then add breadcrumbs (NOT panko) and fry those until evenly golden.

Miso Peanut Butter Noodles

Miso & Peanut Butter Ramen Noodles

This is one of my all time favourite recipes that I’ve created. When I finally got this recipe spot-on, I knew I’d created something great. So great that I made another bowl of if for breakfast the next day… And then again for dinner later that week… This dish combines miso, peanut butter & mushrooms for a rich, thick sauce that really packs an umami punch. My favourite way to have this is with sausage & a jammy boiled egg, but this can easily be made veggie by swapping the sausage for a different protein & the beef stock for veg stock, and vegan by removing the egg! The ultimate upgrade for your packet ramen. Speaking of packet ramen, you can use whichever brand you like for this dish. I use Chapaghetti because I love the thickness of the noodle (slightly thicker than your average packet ramen). I cannot stress enough how much you need to try this recipe – you will not be disappointed.


Miso & Peanut Butter Ramen Noodles

Serves 1 | 20 Mins Prep + Cooking

Ingredients

1 packet instant ramen noodles (I use Chapaghetti)

1.5tbsp chunky peanut butter (my fave is Manilife Deep Roast)

1.5tbsp white miso paste

2tsp soy sauce

1/2tsp beef stock concentrate

150g Chestnut mushrooms, sliced ~0.5cm thick

1 large garlic clove, minced

A handful of parsley, finely chopped

1 egg

Optional: 1 sausage, removed from casing

Method

  1. Boil the egg for 7 mins, once cooked set aside in a bowl of iced water until ready to use.
  2. Heat a small frying pan medium high heat adding ~1tsp olive oil. Break the sausage meat into chunks and flatten slightly. Fry for a minute or two (depending on how hot the pan is) on each side until caramelised and cooked through. Set aside until ready to use.
  3. Add the mushrooms to the same frying pan, add a little more oil if it’s too dry, and fry until all the water has been released, has evaporated and the mushrooms are starting to brown.
  4. Add your crushed garlic and fry, stirring often, until fragrant.
  5. Next add the miso, peanut butter, soy sauce, stock & enough water so that once the noodles are added, they will be submerged. Stir this until well combined & smooth apart from the mushrooms.
  6. Bring this mix to the boil & add the noodles. Cook this, stirring frequently, until the noodles are cooked through and the sauce has reduced and thickened to the texture of thick double cream.
  7. While this is cooking, roughly chop the sausage into mouth-sized chunks. Peel and half the egg.
  8. Once the noodles are cooked, stir through the parsley. Serve in a bowl with the egg & sausage on top.

Note: If you don’t have stock concentrate, swap the water for stock of your choice

Veggies/Vegans: Make this dish veggie by swapping the sausage for a protein of your choice & swapping the beef stock for veg stock. Omit the egg to make it vegan