Cheesy, Tomatoey Sausage Pasta Bake

Cheesy, Tomatoey, Italian Sausage Pasta Bake

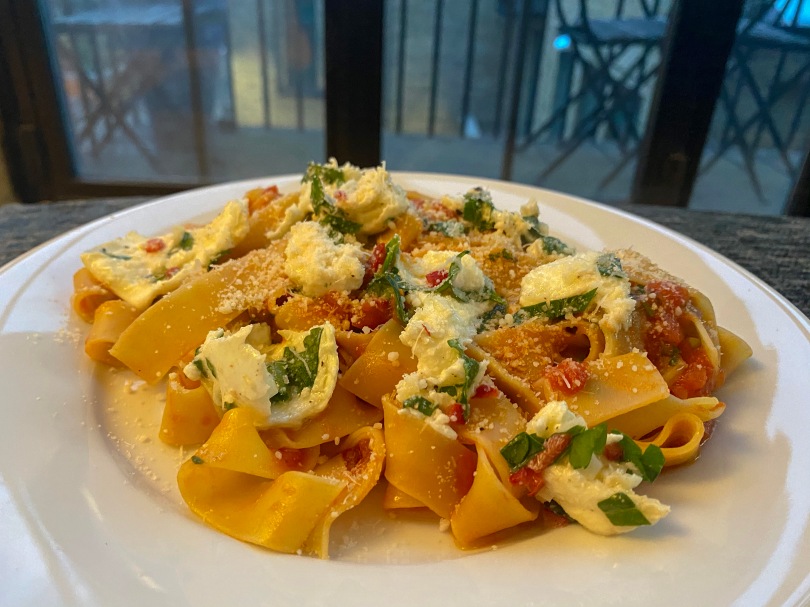
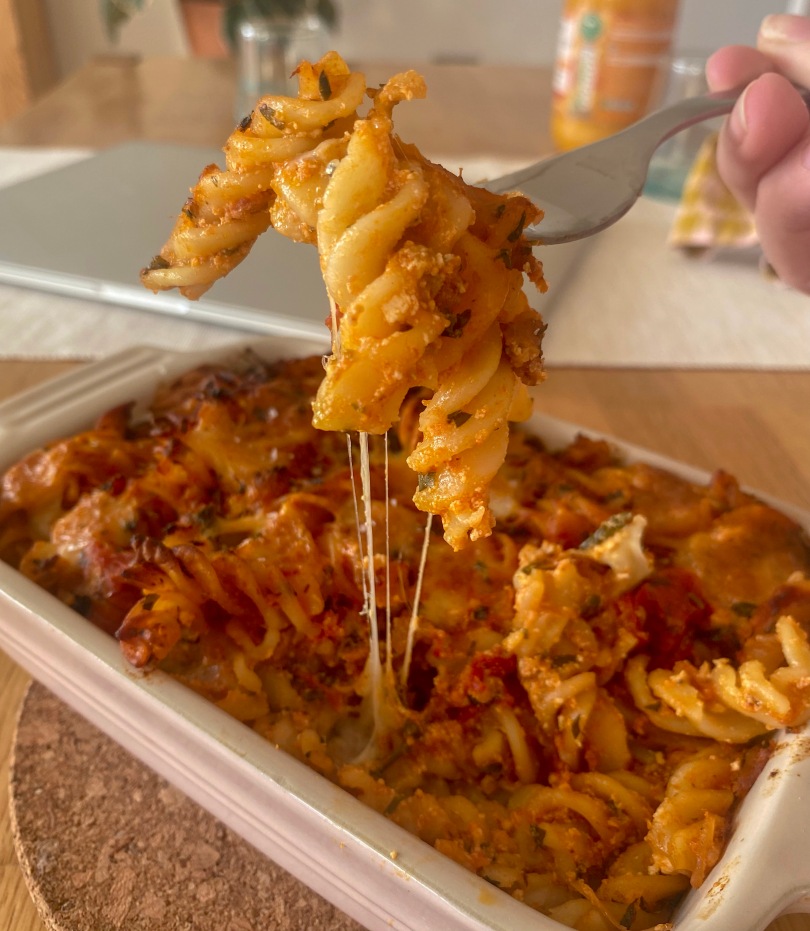
This is one of my go to comfort, hangover dishes. We’re talking cheesy carbs with a real punch of herby, tomatoey flavour. This dish was inspired by one of my fave Chrissy Tiegen recipes – her pasta alla norma. I really liked what she called ‘mozzarella bombs’ – her dish and this one have chunks of mozzarella studded throughout the pasta that get all melty and stretchy as the pasta bakes. When your fork hits a mozzarella clump its like the best treasure discovery you’ve ever experienced. I mean just look at the cheese pull in that pic. The portion sizes on this dish are quite large, because I’m basing it on what I’d eat on a very hungover Sunday (which turns out to be enough pasta for a 2 person standard serving). So be warned when you’re making this – I would say it serves 2 high appetite people, or 3-4 regular appetite.


Cheesy, Tomatoey, Sausage Pasta Bake

Serves 2-3 (2 very hungry) | 1 hour + 40 mins baking

Ingredients

1tbsp olive oil

1tsp butter

1 white onion, sliced crossways into thin half moons

1/2 my Italian Sausage Meat without the garlic

2-3 large cloves garlic minced

2tbsp tomato puree

1 400g tin whole plum tomatoes

Hanful parsley minced

Hanfdul basil minced

A few sprigs of rosemary minced

300g short pasta of choice, rigatoni or dusili

125g ricotta

150g ball of mozzarella cut into 1.5cm cubes

A grating of parm to taste

Method

  1. Heat the oil and buttere in a large saucepan or casserole over low heat. Once melted, add the onions with a pinch of salt and cook with the lid on, stirring often, until it partially caramelises (~15-20 mins).
  2. Once the onions are ready, push to one side of thee pan and splash a little oil in the other. Turn the heat to medium/high. Add the sausage meat – don’t stir for the first minute or 2. You want to form a nice caramelised crust. At this point start to break up the sausage into large chunks. Cook until caramelised all over and a nice fond has formed. Stir through with the onions.
  3. Add the garlic and good for a minute or two until fragrant.
  4. Add the tomato puree, stir and cook for another few minutes until slightly darkened in colour.
  5. Add the tomatoes and about half a tin of water, crush the tomatoes into smaller chunks with a spatula. Add the herbs. Bring to the boil and then immediately turn the heat to low.
  6. Simmer for 20-25 mins. Meanwhile, cook the pasta in heavily salted boiling water until al dente.
  7. Preheat the oven to 180°C/160°C fan
  8. Once the sauce is cooked, stir through the ricotta and add salt, pepper and parm and taste for seasoning. Add the pasta and 3/4 of the mozzarella chunks – stir to combine and transfer to your baking dish.
  9. Bake in the oven for 30-40 mins until bubbling and the mozzarella is nice and melty. Leave on the side for 5 mins and serve!
Eataly Fresh Pasta Class Pici

Eataly Fresh Pasta Cooking Class Review

Anyone who knows me knows I am in love with Eataly and spend a good chunk of my pay-cheque in the store on anything from guanciale to their insane tiramisu. So it only felt right that I had to do a cooking class there. My best foodie friend Ros (check out her foodie insta @rosontour) & I decided that, as our Christmas present to each other, we’d go on a cooking class together, because can you think of a better activity for 2 foodie besties?! Just a quick warning – it is not easy to book an Eataly cooking class! They sell out so quickly (for good reason, but we’ll get onto that later). We tried every month after Christmas but only managed to get tickets in March. We were looking for anything pasta, and the one we were able to book was the fresh pasta one – but there are a whole lot of other classes too. I only later found out there was a mailing list that lets you know when tickets are released… Before I get into the details, I want to say that this was one of the best and most fun evenings I’ve had in a long time, which was only made better by spending it with Ros!

First off lets look at the prices – the class was £65, with that we got 2 glasses of wine and 2 pasta dishes. I think this was such good value especially considering how attentive the chef and assistant were. Both were on hand to help through every stage, and each step was explained to us. We got the recipes to take away too. The cooking class room is in the back corner of the wine area. It’s a small room with space for ~8 students, a teacher and assistant making it a really intimate lesson. Having such a small class was great as we got so much help.

Our cooking station

Now for the session itself. To start the class or chef talked us through the structure of the class and what we would be making. In our case this was:

  • Eggless semolina pasta that we would shape into:
  • Trofie al pesto pomodoro – trofie with red pesto (sundried tomatoes)
  • Pici all’aglione – pici with a simple tomato, garlic & chilli sauce

To our surprise, the chef told us that everything that we make in the fresh pasta class is vegan! Neither of us are vegan, so we were a bit hesitant at first at the prospect of cheese-less pasta but we were both so impressed with the dishes.

We started off making the pasta dough, which was very simple – just semolina, water & salt. The chef then showed us how to form both pasta shapes by hand (no pasta rollers needed). This took up a majority of the class but was really informative. I felt like I understood how to make and handle the dough, and how to form the pasta shapes (even if the trofie took me a few tries to get right). We didn’t have time to shape all of our dough – which sent Ros into a pici frenzy trying to make sure she didn’t waste any dough.

Once we had sufficient pasta, we moved onto the sauce. Both sauces were made in the time we cooked our pasta, and both were absolutely delicious! I’m not gonna give away any recipes here as you need to go and experience the class yourself. But the sauces were so insanely simply, but so tasty. I would even go as far to say we didn’t miss cheese. It just shows what you can do with high quality ingredients at your disposal. We have a little hint for you to make your dishes even more delicious – we drizzled over some of the olive oil when eating our dishes and it make them even better. The oil was amazing, we were so close to stealing it but we restrained ourselves.

Ros & I looking cute at our pasta station

All in all we had such a fun evening – delicious wine, delicious food, delicious oil AND we left with a pasta certificate, AND we got to keep our aprons! We rounded off the evening with a quick gelato downstairs – the perfect end to the perfect evening.

Stracciatella gelato

I absolutely cannot recommend the Eataly classes enough. It’s such a fun way to spend an evening, that feels slightly more productive than just going for dinner (although there is absolutely nothing wrong with just going for dinner). We both learnt things we can take away and use in our own cooking – in fact my recent chilli, garlic & tomato pappardelle was slightly inspired by the pici all’aglione! So get yourself signed up to that mailing list, and take you foodie friends for a lovely, wholesome evening. Let me know what you think in the comments!

You can find Eataly at 135 Bishopsgate, London EC2M 3YD

Chilli garlic tomato pappardelle with dressed mozzarella with parm

Garlic, Chilli Tomatoey Pappardelle With Dressed Mozzarella

We’re back, and it’s another pasta recipe (surprise surprise). Can you tell pasta’s my favourite food? This one is a super tomatoey, garlicky and punchy dish. Think arich, garlic, chilli and tomato sauce over pappardelle with a super tasty and fresh seasoned mozzarella on top. This another quick one, perfect for a weekday dinner. The creamy mozzarella really balances out that rich tomato and mild heat from the chilli. If you can get it, I’d recommend going for a high quality buffalo mozzarella for this dish. The mozzarella is served raw so we’re really after high quality ingredients as there’s no hiding. I’m gonna give you fair warning, this is a very garlicky dish (cooked in the sauce and raw with the mozzarella) so I don’t recommend eating this right before a social gathering, unless you’re all eating it.


Garlic, Chilli Tomatoey Pappardelle With Dressed Mozzarella

Sevres 2 | 30-40 mins cook + Prep

Ingredients

1 ball good quality buffalo mozzarella

4 cloves garlic, 1 clove minced and the rest thinly sliced

2 red chillis, deseeded and thinly sliced

Large handful basil minced

Large handful parsley minced

1tsp red wine vinegar

A few good glugs of good quality extra virgin olive oil

1 tin plum tomatoes

180g dried pappardelle

2-3tbsp grated parm + more to serve

Method

  1. Tear the mozzarella into bitesize chunks and place in a bowl. Add the minced garlic, 1/4 of the chilli, a small handful of parsley & basil, red wine vinegar and a good few glugs of olive oil. Season with salt and pepper, stir, cover and chill in the fridge until ready to eat. This can be done a few hours ahead
  2. Heat 2-3 tbsp olive oil in a medium sauce pan over medium/high heat. Add the sliced garlic and the rest of the chilli. Cook, stirring frequently, until the garlic just begins to turn golden and is fragrant (should take around 5 mins, depending on your hob).
  3. Add the tomatoes, and about 1/2 tin of water. Squish the tomatoes with a spoon. Bring this to a boil then lower the temperature and simmer for 20-30 mins until the sauce has thickened.
  4. Add in the rest of the parsley & basil, and the grated parm. Season to taste with salt & pepper.
  5. Cook the pappardelle in heavily salted pasta water until al dente. Reserve a mug of pasta water towards the end of the cooking time. Combine the pasta & sauce, and add some pasta water to reach your desired sauce consistency.
  6. Serve the pasta with the torn mozzarella on top & more parm if you like!
Pistachio Pesto Pasta With Burrata

Pistachio Pesto Pasta With Burrata

This is another one of my super quick & easy pasta dishes, but this one has a little extra wow (and by wow I mean a whole burrata on top). Which makes this the perfect dish for trying to impress friends with very little prep time. It consists pasta, a super flavourful and simple pistachio pesto and a whole burrata on top. What’s not to love? My favourite pasta to use here is trofie. This is an eggless semolina based pasta, which means the texture is a little chewier and has more bite than a standard egg pasta. This pasta type + pasta water and pesto make for a really luxurious feeling sauce. I’ve added pancetta to mine for a little extra salty crunch, but this is totally optional. It’s just as delicious without!


Pistachio Pesto Pasta With Burrata

Serves 2 | 20mins cook + prep

Ingredients

30g basil

1/2tbsp pine nuts

2tbsp pistachios

1 clove garlic

30g grated parmesan

4tbsp extra virgin olive oil + more to serve.

180g pasta (I prefer to use trofie for this)

1 burrata

Optional: 90g pancetta

Method

  1. Toast the nuts in a dry frying pan over medium high heat until lightly toasted – watch this like a hawk as it can burn really quickly. Set aside to cool
  2. Bring a large pot of heavily salted water to the boil, add the pasta and cook until al dente. Reserve a mug of pasta water near the end of the cooking time.
  3. If using, add the pancetta to a cold pan and put this over medium high heat. Cook until crisp and the fat has rendered.
  4. Meanwhile, make your pesto. Pestle & Mortar method (my preferred method, see notes): add the cooled nuts, garlic and a pinch of salt to a mortar and grind using the pestle in circular motions, pushing the mix against the edge of the bowl, until it forms a paste. Next add the basil (you may need to do this in stages to get it to fit) and grind until a paste forms. Add the grated parmesan, grind to combine. Transfer this mix to another bowl and add the olive oil while stirring. Season with salt and pepper to taste.
  5. Alternatively, if you prefer to use a food processor, add all ingredients to a food processor and blend until a paste forms. Season to taste
  6. Once cooked, combine the pasta with the pesto, pancetta (if using) and a splash of cooking water – add more if needed reach your desired consistency. Season with salt and pepper as needed.
  7. Transfer to a serving dish, place the burrata on top and cut it open, allowing the creamy middle to run over the pasta. Add more salt & pepper on top, and finish with a drizzle of extra virgin olive oil.

Note: I generally prefer the pestle & mortar method as a food processor can bruise the basil and leave you with a bitter tasting pesto. The pestle and mortar method makes for a much creamier pesto

Creamy Sausage Ragu

Creamy White Sausage Ragu

For me there is no better way to spend a Sunday than making a ragu. There is something so relaxing and therapeutic about focussing your whole mind on cooking for a few hours. Every step requires so much care and attention from chopping all the veggies perfectly to simmering it all down. All that time and effort is immediately made worth it when you taste the first bite and you realise you’ve made something really special. Making a ragu such a rewarding experience in so many ways – the process of cooking it and the amazing meal you get at the end. Anyway, enough of my love letter to ragus – lets talk about this sauce.

This sauce is the culmination of all my ragu-related learnings over the years from the Italian cooking heroes Anna Del Conte & Marcella Hazan. I always like to have a ragu in my freezer as it makes for such an easy but still tasty and high quality dinner. So I usually have a few boxes of ADC or Marcella bolognese, and now I’m adding this white ragu as a freezer staple (high praise as I only have a half freezer & 1 of the drawers is unusable from constantly freezing shut). It’s a much richer and creamy version of its tomatoey conterpart, and there is space for both in my heart. The sauce is SO flavourful from the love and time that goes into cooking it – I really can’t recommend it enough!


Creamy White Sausage Ragu

Serves 4-8 (depending on how saucy you like pasta – see notes) | 2.5-3.5 hours prep + simmer time

Ingredients

2 cloves garlic

25g butter

1tbsp olive oil

1 white onion

1 bulb fennel

454g sausage meat (or sausages removed from their casing)

3 tsp fennel seeds toasted & crushed (or fennel pollen)

2 tsp dried thyme

2 tsp dried oregano

150ml milk

150ml dry white wine

200ml chicken stock

150ml cream

Large handful of parsley, finely chopped

25g grated parmesan

Method

  1. Prep the veggies: peel and crush the garlic with the side of a knife; finely dice the onion; quarter the fennel, remove the core and finely slice.
  2. In a casserole dish/dutch oven, heat the butter and oil over medium/low heat. Add the garlic and cook until golden. Remove the garlic and set aside.
  3. Add the onions and cook until starting to soften and turn translucent. Add the fennel and cook until slightly softened – 10-15 mins.
  4. While the veggies are cooking, combine the sausage meat with the fennel, thyme, oregano and salt & pepper.
  5. Once the veggies are cooked, turn the heat up to high and pushed the vegetables to the side of the pan and add the sausage meat – this ensures the meat browns rather than stews. Leave the to cook undisturbed for a minute or two until brown, flip the meat and repeat on the other side. Leaving the meat like this allows it to brown & form chunks, this adds so much flavour and means it won’t completely break down in cooking.
  6. Use a spatula to break the sausage meat in large chunks and stir through the vegetables. Cook, stirring occasionally until the meat is cooked through with lots of brown/caramelised pieces. A good fond will start to form (this is the brown stuff sticking to the bottom of the pan) – don’t be afraid! This will be a source of a lot of flavour.
  7. Once the sausage is ready, add the milk, bring to the boil and then reduce the heat to low. Simmer until the milk has almost completely disappeared, through this step scrape the bottom of the pan to release the tasty tasty fond. Marcella says to add the milk before the wine as it protects the meat from the acid of the wine, and I trust that woman with my life. Add the wine and again reduce until all the liquid is almost gone.
  8. Add the stock, turn the heat as low as it’ll go and place the lid on the pan slightly askew. Leave this to simmer for 30-45 mins. Add the cream and simmer for a further 45-60 mins.
  9. Once cooked, take off the heat stir through the parsley and parmesan. Serve with your favourite pasta and more parm and parsley on top.

Notes: you’ll notice the service size is quite a big range. This is because the way Italians & English have their pasta is very different. The english way is to add a lot of sauce, but the Italian way is to be much more sparing with sauce. I lean towards the Italian way, especially with this sauce – it’s so flavourful so a little goes a long way. When I have this dish I usually combine the sauce with a little pasta water to thin it out slightly to cover all the pasta.

Pasta Puttanesca

Puttanesca (-esque) Sauce

I learnt about this sauce from the Series of Unfortunate Events movie (IYKYK) and I’ve never looked back. Its a super salty, umami, rich tomatoey sauce – it really packs a punch without feeling too heavy. This is such a great go to weeknight dinner, sped up even more by using a frozen batch of my marinara. I always have a stock of this in my freezer as it can be adapted for so many dishes, and having the sauce ready knocks a good 20 mins off cooking times. This is another of my 15 minute pasta dishes where the sauce is prepped & cooked in the time it takes the pasta to cook. I’ve called this puttaensca-esque as I’ve included tuna which the original doesn’t – I love the addition of tuna for some extra fishiness and protein which keeps me fuller longer.


Putanesca (-esque) Sauce

Serves 1 | 15 mins prep + cook

Ingredients

100g fusilli or other short pasta (or 75g if you aren’t very hungry like me 95% of the time)

1 large clove garlic, thinly sliced

3 jarred/tinned anchovy fillets

1/2 tin tuna (drained)

1/4 batch of my marinara sauce

35g black olives roughly chopped

1tbsp capers

Sprinkle of chilli flakes, to taste

Handful parsley finely chopped

Squeeze of lemon to taste

Parmesan to serve

Method

  1. Cook the pasta in a heavily salted pan of water until al dente.
  2. Meanwhile, heat a splash of olive oil in a frying pan over medium high heat. Add the anchovies and fry, stirring often, until they dissolve into the oil.
  3. Add the garlic and frying until golden. Keep a close eye on this as this will burn quickly. Add the tuna and stir until combined
  4. Reduce the heat to low and add the marinara, capers, olives and chilli flakes (if using). Stir until warmed through. If the sauce is too thick at this point, add some pasta water to reach the desired consistency.
  5. Take off the heat, add salt, pepper and lemon juice to taste. Stir through the parsley (reserve some to serve) and set aside.
  6. Once the pasta is cooked, combine with the sauce and serve with the remaining parsley sprinkled on top and some grated parmesan.
Crabonara (crab carbonara)

Crabonara (Crab Carbonara)

This dish was born out of my mum mishearing carbonara as crabonara – at the time neither of us had any idea that she had just inspired one of my best recipes yet (in my opinion anyway). It really is what it says on the tin – a carbonara but with crab instead of bacon. It’s a super quick dinner, perfect for a week night, that doesn’t skimp on quality or flavour. It really is a 15 minute meal – everything can be prepped while the pasta cooks. It’s creamy and rich like a carbonara, but with the delicate saltiness of crab instead of the salty punch from pancetta. 2 different but equally delicious meals. This version is a lot less rich than my Perfect Carbonara as it uses only the 1 egg per person, making it a bit more suitable for an everyday meal.


Crabonara

Serves 2 | 15 mins

Ingredients

200g long pasta (spaghetti or linguine work well)

100g mixed crab meat

1 large clove garlic

2 eggs

50g parmesan, grated + more for service

Freshly ground black pepper

Splash of olive oil

Method

  1. Cook the pasta in heavily salted boiling water 2 mins shorter than the packet says
  2. In the meantime, heat up a splash of olive oil in a frying pan over medium heat. Add the garlic and fry until lightly golden. Add the crab and cook, stirring often, until warmed through. Set the pan aside
  3. Beat the eggs with the parmesan in a bowl and add freshly cracked black pepper. Near the end of the pasta cooking time, add 2-3 tablespoons of pasta water to this mix while stirring (this will temper the eggs).
  4. Once the pasta is cooked, transfer it to the frying pan with the crab in. Turn a hob to low heat but keep the pan away from the heat for the moment.
  5. Add the egg mix into the pasta pan, be sure to keep moving the pasta continuously to avoid scrambling the eggs.
  6. Move the pan on and off the heat, stirring continuously until the egg is cooked and a silky sauce has formed (a few mins, depends on your hob). If you think the pasta is too dry add a tablespoon or two of pasta water until it’s your desired consistency.
  7. Serve with more freshly cracked black pepper and grated parmesan.
Meg's Perfect Spaghetti Carbonara

Meg’s Perfect Carbonara

I would like to say as a disclaimer I am not Italian, and I apologise if this recipe does not represent a traditional carbonara. I am merely a super-fan of the Italian cuisine who happens to have made a delicious carbonara recipe. As a word of warning, this is probably the richest carbonara you will have, owing to the use of an egg and an egg yolk per person, so be prepared to be very full if you make this. This is not your everyday carbonara – you have been warned.

You may find it odd I only use parmesan and no pecorino, but I actually prefer an all parmesan carbonara (again, sorry) – so feel free to half & half pecorino & parmesan if you so wish. The thing I will definitely stick to tradition for is the guanciale. If you can get your hands on it I reaaaally recommend using guanciale. It adds a much deeper flavour than pancetta and really elevates this dish. I get mine from Eataly usually, but I’ve also ordered it from Lina Stores who ship nationwide! This is the product of endless carbonara trial & errors, until I found the perfect egg/egg yolk/cheese etc. balance. I am finally here sharing with you my perfect, foolproof carbonara: the dinner to wow anyone made in under 30 mins.


Meg’s Perfect Carbonara

Serves 2 (hungry people) | 20 mins prep & cooking

Ingredients

200g pasta of your choice (my personal faves include paccheri, rigatoni & linguine)

150g Guanciale chopped into chunks (or pancetta if you can’t get your hands on guanciale, but the guanciale really adds the ‘wow’)

2 whole eggs

2 egg yolks

75g grated parmesan (or half pecorino, half parmesan)

Freshly ground black pepper (you won’t need much if you’re using guanciale)

Method

  1. Cook your pasta in a pot of water salted like the sea for 2-3 mins less than instructed on the packet.
  2. In the meantime, add your guanciale to a cold frying pan and bring up to medium/high heat. This renders out he fat giving you extra crisp and completely not flabby fat (ew). Drain any excess oil and set aside off the heat until the pasta is ready.
  3. Beat your eggs, egg yolks, parmesan and freshly ground pepper until combined. Add 3-6 spoon fulls of pasta water (this depends how loose your like your sauce, 3 spoons will be a drier sauce) to your egg mix one by one, beating the whole time to temper your eggs and help prevent scrambled egg pasta
  4. When the pasta is done, transfer it to your guanciale pan and return to medium heat being sure to reserve the pasta water.
  5. Add a ladle of pasta water to the pan and cook until almost disappeared. Check if your pasta is cooked to your liking, if still a little too firm repeat this stage.
  6. Once the pasta is cooked, take the pan off the heat and add your egg mix to the pan while constantly moving the pasta. Keep tossing the pasta while moving between off the heat & on low heat (this helps you keep more control of the cooking, and stop the eggs scrambling)
  7. Continue this process until the sauce has thickened and clings to the pasta. Exactly when the sauce is done depends on how you like your carbonara, but you need to cook long enough for the eggs to be cooked thoroughly. You can add some extra pasta water here if you want your sauce a little looser.
  8. Serve with extra parm and some freshly cracked black pepper
Garlicky anchovy pasta

Speedy Garlicky Anchovy Pasta

Even when I don’t have much time to cook, I refuse to sacrifice deliciousness. I created this pasta for such situations. I used strong flavours to make it exciting despite its simplicity (think salty, anchovy-y, tomatoey goodness). It uses mostly store cupboard ingredients too so not only is it quick to cook, you might not even need to go to the shop. As the cooking of the pasta is finished off in the sauce, the sauce ends up feeling very luxurious and clings to the pasta. This truly is a speedy dinner as the sauce is cooked in the time it takes the pasta to cook.


Speedy Garlicky Anchovy Pasta

Serves 2

15 mins prep + cooking

Ingredients

150g linguine or spaghetti (or any pasta really, but it works well with a long pasta)

1.5 tbsp olive oil

6 anchovy fillets in oil, roughly chopped

4 garlic cloves thinly sliced (or 2 large cloves)

Juice 1/2 lemon

2 tbsp tomato puree

1 tbsp butter (or more to taste)

4 tbsp grated parmesan (or more to taste, plus extra for serving)

Handful of parsley chopped

Panko breadcrumbs to serve (if you can get your hands on lemon & black pepper breadcrumbs, get those!) see the note for how to make the breadcrumbs a little fancier

Method

  1. Add your pasta to salted boiling water and cook for a few minutes less than the packet says.
  2. Meanwhile, add your oil and anchovies to a frying pan on medium high heat and cook until the achovies dissolve.
  3. Add the sliced garlic and cook until lightly golden
  4. Add the lemon juice to the pan and cook until mostly evaporated.
  5. Add the tomato puree and cook for a few minutes, stirring regularly until the colour darkens slightly. Take off the heat until the pasta is ready.
  6. Once the pasta is cooked, put the frying pan back onto medium high heat and transfer the pasta over being sure to reserve the pasta water. Add 100-200ml of pasta water to the frying pan and bring to a boil, stirring often, until reduced to almost nothing. Repeat this process until the pasta is cooked to your liking.
  7. Take the pan off the heat and add the butter & Parmesan. Stir through and add more butter/Parmesan to your taste. Add the chopped parsley.
  8. Serve with more parm and the breadcrumbs sprinkled over

Note: If you have time, I definitely recommend sprucing up your bread crumbs a little. In a frying pan heat up 1 tbsp oil + 1/2 tbsp butter with 2 minced cloves of garlic. Fry until golden, then add breadcrumbs (NOT panko) and fry those until evenly golden.

Christmas pasta bake

Christmas Leftovers Pasta Bake

Christmas dinner is the meal that keeps on giving. I don’t know if your family do the same but we will make a meal big enough to feed at least double the number of people actually coming for Christmas day (there was over half a Turkey left this year). So the fun challenge over the next few days is finding ways to transform the leftovers into something completely different so it doesn’t feel like we’re eating the same meal over and over. This year I had the craving for pasta (what’s new?) so I though of a leftovers pasta bake which uses the turkey/stuffing and some cheese board leftovers. A pasta bake/mac and cheese/Christmas roast crossover. The most ambitious crossover event in history.


Christmas Leftovers Pasta Bake

Serves 6 | 30 mins

Ingredients

450g short pasta (fusilli, penne, rigatoni – I used some Christmas Pasta like this one)

50g butter

2 cloves garlic, crushed

50g plain flour

700ml milk

6 tbsp grated parmesan

500g turkey & stuffing (or other meats) leftovers, roughly chopped – I used turkey, chestnut & sausage stuffing

~100-200g leftover hard cheese grated (cheddar, Gouda or Gruyere would work well – something with flavour that will melt)

Juice 1/2 lemon

150ml 1/2 fat creme fraiche

1-2 slices day old sourdough (or whatever bread you have), processed into breadcrumbs

1 tsp olive oil

Method:

  1. Bring a large pan of salted water to the boil, add your pasta & cook until al dente (you may want to do this after you’ve started on the sauce, depending on the cooking time for the pasta)
  2. Meanwhile, melt the butter in a medium saucepan over medium heat. Add the crushed garlic & cook until lightly golden.
  3. Add the flour & cook stirring continuously for 1-2 mins
  4. Add the milk gradually, whisking until smooth between each addition. If you have any leftover gravy, you could also add this to the sauce as this point for some extra flavour.
  5. Cook this, mixing continuously, for a few minutes until thickened. Stir in some pepper, 4tbsp of grated parmesan & a few handfuls of your grated hard cheese of choice (make sure there is enough leftover to sprinkle over the bake at the end).
  6. Add the pasta, turkey meat/stuffing & creme fraiche to the sauce. The creme fraiche is needed to cut through what is otherwise a very rich dish.
  7. Season this to taste with salt, pepper & lemon juice.
  8. Turn your grill onto high heat.
  9. Pour the pasta into an 30cm x 20cm baking dish. Sprinkle the grated hard cheese over the top. In a separate bowl stir together the breadcrumbs, remaining 2tbsp of parmesan and 1tsp olive oil. Spread this mix over to the top of the pasta.
  10. Grill for a few minutes until the cheese is melted & the breadcrumbs have browned. Keep an eye on this as it can burn very quickly.