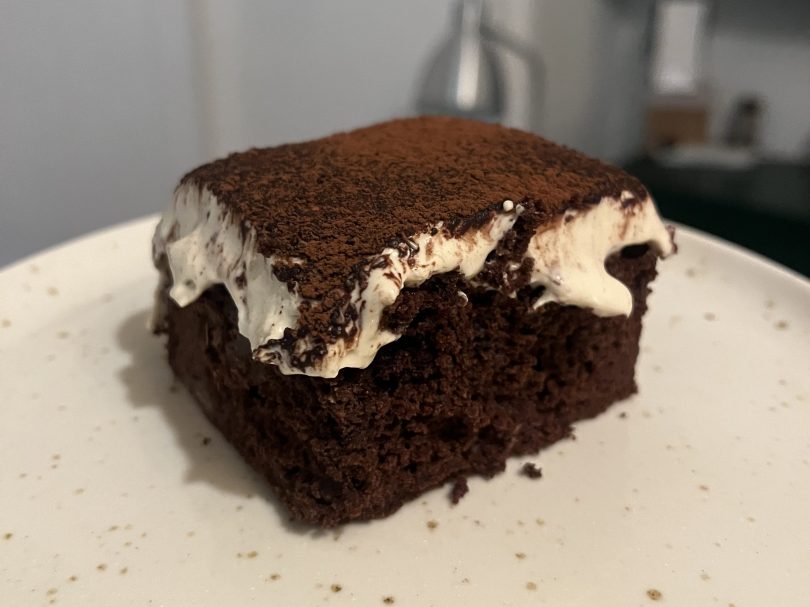
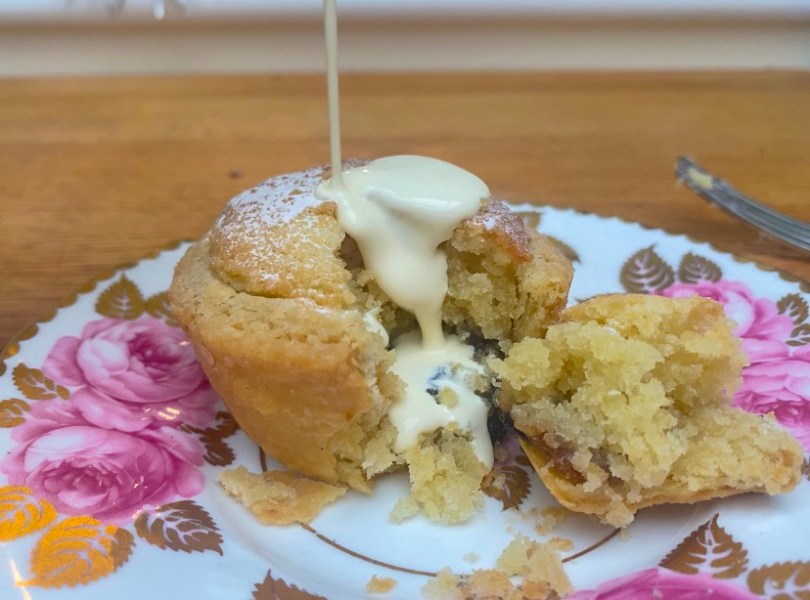
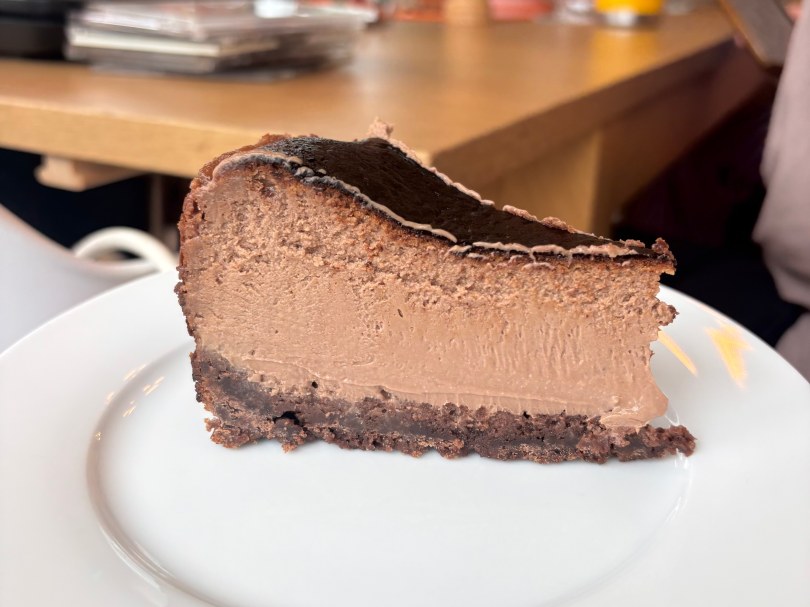
I love chocolate, I love coffee – I love brownies and I love tiramisu. What could possibly go wrong combining the two? It makes for the most delicious, decadent and moreish dessert. Think dense, fudgy brownies with a light, coffee flavoured mascarpone cream. They balance perfectly for a dessert you will not be able to stop eating. I saw a similar recipe for this on TikTok but couldn’t find it online, so decided to cobble together my own version. I used my favourite brownie recipe (which is the Bon Appetit tripl chocolate brownies – incredibly dense and chocolatey, with chocolate chunks throughout) but feel free to use your favourite recipe. You just want to bake it in an 8x8inch pan, with baking parchment lining all sides (this makes it much easier to remove from the pan once you’ve added the coffee cream). I then whipped up a classic tiramisu cream but I added coffee, to make up for the lack of coffee soaked lady fingers. And of course, you have to shower the whole thing in cocoa powder. You HAVE to try it!
Tiramisu Brownies
Makes 9 large brownies | 1 hour prep + 30 mins cooking + chill 12hrs or overnight
1tbsp instant espresso powder (more if you want a strong coffee flavour)
80-100g icing sugar (to taste)
1tsp vanilla paste
Pinch of salt
Cocoa powder to dust
Method
Make your choice of brownie recipe in an 8×8 pan lined with baking parchment all the way up each side. Leave brownie to cool completely in the pan. Before adding your cream layer, I recommend removing the brownie from the pan and putting it back in. This will make getting it out later much easier.
Combine the double cream and coffee. Set aside for a few minutes to allow the coffee to dissolve.
Combine the egg yolks and caster sugar in a large bowl. Beat until no longer grainy – you may wish to add a few tablespoons of your coffee cream to help with this.
Add in the mascarpone and beat until smooth.
Add the double cream, icing sugar vanilla and salt, beat until combined. At this point taste for sweetness and coffee-ness – add more as needed. Beat until thickened – it won’t reach stiff peaks but get it as close as you can.
Spread your cream over your brownie and cover with cocoa powder. Chill for 12 hours or, ideally, overnight.
Remove from the tin using the baking parchement sides and cut into 9. Serve and enjoy!
All of you who have read my How To Host A Wedding Cake Tasting will know I’m making the wedding cake for my lovely cousin Bryony & her now-husband Lush. Well, the big day has now happened and I can reveal there were no cake-related disasters! But above all that, it was the most beautiful day watching the best couple getting married. I started sobbing the moment I saw Bryony walking down the aisle and didn’t stop until the ceremony was over. I love weddings, and this was a really, really special one!
As much as I could talk about the wedding for the entire post, you’re all here for the cake. As I said in the last post, they chose 2 flavours, one for each tier:
Bottom Tier: Chocolate cake, dark chocolate ganache, crumble and miso caramel
Top Tier: Vanilla cake soaked in passionfruit syrup, white chocolate ganache (for structural support), mascarpone cream, passionfruit curd, crumble and passionfruit caramel
You’re probably wondering how on earth did I manage this with a full time job, when I live in London & the wedding was in Suffolk & cook all the components at the right time so they wouldn’t go off by the wedding? The answer is a spreadsheet. I could not have done it without my spreadsheet.
This is my trusty spreadsheet – the table at the top shows what I need to make, the recipe, how much to make and the date I cold make it. The small table at the bottom shows my plan for the week of the wedding
On this spreadsheet I listed my components, recipes, quantities of each recipe & how far ahead of the event I could cook it. I used that to work out my ingredients and to put together a cooking calendar for the week before. The caramel and syrup I was able to fo a few weeks ahead, but everything else was done on the week of and that was limited to the Tuesday, Wednesday & Friday as I had dinner plans on Monday and was travelling back home on the Thursday to head to Suffolk with my family on Friday. The days I did the cooking, I was cooking util 11-12 at night… It was definitely hard after my usual 9-5, and I cannot promise you I wasn’t talking to my mixer and swearing at Siri at one point. On Tuesday I did the ganache and crumble, Wednesday I did the cakes and Italian meringue frosting, and on Friday I made the mascarpone frosting, mixed up my caramels and syrups (just added miso or fresh passionfruit juice), rewhipped all my ganaches/frostings and assembled the cake.
I chose to make all the components ahead of time and transport these to Suffolk to assemble in our cottage there. This seemed a lot easier and less risky than transporting a full wedding cake. I stacked both cakes on a cake board 1cm larger than the diameter of the cake (to give some space for frosting), then chilled each for ~30mins until the ganache set:
Bottom Tier: I levelled the chocolate cakes. Spread a layer of the dark chocolate ganache over the whole cake and piped a ring around the edge – this stops the other fillings oozing out. Then I covered the ganache with miso caramel, keeping it inside the ring, and sprinkled over crumble. I stacked the next cake and repeated. I like to stack my last cake upside down as this leaves a really level surface on top. I made sure to smooth the edges of the cake first where any ganache oozed out, and also filled in any gaps before chilling.
Top Tier: I levelled the vanilla cakes and spooned over the passionfruit syrup – this keeps the cakes nice and moist (sorry). I piped a ring of white chocolate ganache around the edge of the cake and a splodge in the middle – this gives some structural support as the fillings for this are quite soft. Inside the ganache ring I spread a layer of mascarpone frosting & rippled through some passionfruit curd and passionfruit caramel. Then I sprinkled over some crumble. Stacked the next cake and repeat, again stacking my last cake upside down. As before I smoked out the ganache and filled in any gaps.
Inside of the chocolate layer: Miso caramel, dark chocolate ganache and crumble
Once these were set, I crumb coated each with a thin layer of Italian meringue frosting. I made sure to keep this as smooth as possible and the corners as crisp as possible. If you need tips on this, give How To Cake It a watch – she is the icing master. I set the crumb coat in the fridge until it was dry to the touch, then did the final coat. I double made sure this was smooth and perfect as the cake design was super simple – plain frosting with a few flowers. I left these to set in the fridge overnight.
Wedding cake stacked and iced, ready for flowers
The next morning, we took the cakes, a cake stand, dowels, and all my cake equipment to the venue. Here I inserted a dowel into the bottom tier, measured and cut flush with the cake. I repeated this to total 5 dowels. I stuck the bottom tier to the cake stand using a small splodge of frosting. Next, the nerve-wracking part: stacking. I put a splodge of icing on the bottom tier and lifted the top tier (my cake spatula came in SO handy) and placed it on top – I was able to centre it with my hands. Next I went over with my leftover frosting and filled any gaps, and my sister (my cake assistant) cleaned up the stand. We had some leftover flowers that my sister and I arranged after wrapping the stems with floral tape. After 2 attempts at flower arranging, we finally had it! I put it in the fridge and sighed a HUGE sigh of relief. My first wedding cake done!
The bride & groom absolutely loved it, and everyone who tasted it told me it was delicious! I actually wouldn’t know as I didn’t taste any of it… Too busy drinking & dancing. All in all, my first wedding cake was a huge success, and I’m so happy Bryony & Lush loved it too! I have 2 more wedding cakes in the books, and I think that’ll be me done for a good few years!
As my friends’ and family’s resident baker, I’ve now been drafted for 3 wedding cakes, having never done one before… The first one is for my cousin & her fiancé in May, so of course we needed to do a cake tasting to decide the flavours. For context, my cousin is also a major foodie & definitely a big part of why I now am so obsessed with food – check out her insta @bees.eats if you need proof. I asked them for a list of flavours they might like and they sent these criteria:
Chocolate tier: plain choc or with a salted/miso caramel/something salty, also pistachio
Fruit tier: passionfruit, mango, raspberry, lemon & elderflower. No coconut
So I took that brief & made loads of cakes, frostings & fillings that fit the brief (using a trusty spreadsheet to plan the timing because I am that person). I decided not to assemble whole cakes, and instead to lay out all the components to mix & match the flavours. That saves me a lot of time and means we can try more combinations.
Here is the final spread:
Wedding cake tasting spread
A Vanilla Sponge: I swear by Cupcake Jemma’s recipe – super buttery & moist (sorry), but really holds structure. This recipe, and all other Cupcake Jemma ones mentioned, are in The Cake Book – this is my baking bible & I recommend it to everyone. It has the best basic staple recipes (& lots of exciting cupcake recipes too). I used the raspberry ripple cake recipe but without the raspberry fruit goo. I made 1/2 of the recipe and cooked it in one 20cm tin, which meant I needed to cook it a little longer than the recipe said.
A Chocolate Sponge: Again, I use Cupcake Jemma’s recipe. It’s so fudgy & the perfect level of richness. I used the ridiculous chocolate cake recipe. I made 2/3 of the chocolate cake recipe and cooked it in one 20cm tin. Again I had to cook this a little longer.
Elderflower Simple Syrup: I made my simple syrups by first heating equal parts water & granulated sugar over a medium heat until the sugar dissolved. Leave this to cool, then add elderflower cordial to taste. I use simple syrup to infuse more flavour into the cakes but also to keep them moist (sorry again) while decorating & being stored.
Lemon Simple Syrup: I used the same base syrup as above but added fresh lemon juice to taste.
Passionfruit Simple Syrup: Same as above, but sub the lemon juice for passionfruit juice (push the pulp through a sieve)
Cream Cheese Frosting: I use cupcake Jemma’s recipe for this one again from the book above. I made 1/4 of the recipe.
Lemon & Elderflower Cream Cheese Frosting: For this I used 1/2 of the cream cheese frosting I made (I left half plain) & stirred in elderflower cordial & lemon juice to taste. This does make the frosting a little runny, but it’s absolutely fine for getting the flavour in a tasting where we don’t need the structural support.
Mascarpone Frosting: I used 1/2 this recipe for this frosting. This makes a really rich, creamy filling that’s not too sweet.
Pistachio Mascarpone Frosting: I used 1/2 of the mascarpone frosting I made (& left half plain) & beat in a few teaspoons of pistachio cream (or to taste). Something like this pistachio cream from Sous Chef – I buy mine from Eataly.
Passionfruit Caramel: I used this recipe for caramel which makes a thick caramel sauce, the perfect texture for spreading with an almost bitter taste to it if you cook the sugar until deep amber. I took half of the caramel and stirred through the juice strained from one passionfruit. I absolutely loved this – it was thick & rich, with a kick of passionfruit sharpness. It wasn’t too sweet either I think due to the passionfruit, and that I cooked the sugar until quite a deep colour which gave it a beautiful bitterness.
Miso Caramel: I dissolved ~1tsp of miso in 1tsp of boiling water & stirred this through the remaining half of the caramel. Think highly elevated salted caramel – the miso gives the savoury side to this rich caramel.
Milk, White & Dark Ganache: I used 100g of each with cream in the following ratios. Dark 1:1, Milk 2:1, white 3:1. This Liv for Cake post explains the different ratios needed for each chocolate type and texture needed. I used the runnier ratio as this was just for tasting, but in a cake I’d want a thicker texture.
Crumble: I used Yolanda Gampp’s recipe for this but without the cinnamon. This is the perfect buttery crunch to add some texture to your cake.
After trying a whooole lot of combinations, we decided on 2 flavours, one for each tier. And with special permission from the bride herself, I can tell you the flavours:
Chocolate cake, dark chocolate ganache, miso caramel and crumble
It surprisingly didn’t take too long to land on these combos – we tasted them and immediately knew that was it. They’re delicious and a bit different to a classic wedding cake. It did mean I ended up with mountains of leftovers, which wasn’t surprising considering just how much of everything I made for only the 3 of us. But, everyone in my office was very grateful when I brought them in – I made a lot of friends that day. Decoration is still TBC, but I’ll make sure to do a post on the final cake. In the meantime, please wish me luck and if you have any tips let me know in the comments please!
This year I challenged myself to make my best gingerbread house yet, and I think I succeeded (feedback from my family, not just me patting myself on the back). This took me about 4.5 days of baking, decorating & building – and I have 0 regrets about how I used that time. In fact, I think this is probably my favourite way to spend the days up to Christmas. It’s no surprise I love being in the kitchen, so getting to spend 4 days solid working on something while watching ‘Are You Scared?’ on YouTube (my idea of festive viewing) is kind of my dream. Plus it makes for the best Christmas decoration.
My Process
My process for making a gingerbread house starts with trawling Pinterest for inspiration – this was my board for this year. I landed on doing a Victorian style house with bay windows, a balcony and double roof. I used this house to model mine on. The next stage is I give the pictures to my engineer dad & he magically turns it into working templates. I have very little knowledge about how this part works…
Next I move onto the baking. This year I made a double batch of this BBC Good Food gingerbread recipe – the raw dough is so good I’m surprised any of it got baked up. I roll the dough about 0.5cm thick (some key pieces a little thicker for stability) & use a sharp knife to cut out around the templates.
After baking the dough expands a little so, once cooled completely, I flatten off and trim the edges using a microplane grater, checking against the templates. This makes sure the pieces will fit together flush when it comes to building. The baking & trimming took me a full day.
The next step is to decorate. For this I used 1 batch of royal icing from the same BBC Good Food recipe. I used gelatine leaves as window panes by attaching them behind the window with royal icing. Once these had dried enough, I flipped the pieces at did aaaall the royal icing decoration – this took me about 4/5 hours. I left these to dry for a few hours. I keep my royal icing fresh by clipping the top of the bag and covering the tip with cling film.
To build, I used royal icing on a chopping board. I first but up the walls, then left it to set overnight before attaching the roof. Then added all the external decoration pieces & candy canes. PSA: Candy canes are very hard to saw without shattering… I used chocolate buttons to tile the roof – this can only be done once the roof gingerbread pieces are fully set. I added a few icicle details & then filled in the board with royal icing (I had to make a second, slightly thinner batch to do this).
And there you have it – a mere 4.5 days of work later – a Gingerbread House! The funny thing is, I don’t really like gingerbread… So now it’s up to my family to eat it all.
The finished house – fairy lights and all
Top Tips
So, having spent days on this thing I thought I’d share some of the things I’ve learnt along the way to help you make a successful custom gingerbread house:
Spend time on the templates. It’s worth spending a little extra time on these to make sure it works, as this is hard to fix when it comes to assembly. You could even make a card mock-up to check everything fits.
It’s better to cook your gingerbread a teeny bit longer than normal to make sure it’ll cool hard all the way through. I added 1-2 mins to the cooking time.
Always shave the sides of your gingerbread. Gingerbread expands slightly meaning it’ll be bigger than the templates and make not fit together properly. I used a microplane grater to do this.
Always make a few extra gingerbread fingers. These came in really handy this year when I realised one of my walls was too short. I propped it up on my extra gingerbread – which really saved the house.
Decorate your pieces before attaching – this is much easier horizontal than it is vertical.
When putting together the walls, pipe a little extra icing along the inside of the join for extra stability.
I had to use dowels on the back of the pieces making up the tallest point, as these started to bend slightly as they got stale. So if you have any extra tall/thin pieces be sure to stabilise then using dowels & royal icing to attach.
‘Snow’ covers a multitude of sins – if something’s gone slightly wrong or a seam looks a little dodgy, cover it in royal icing and act like that was always meant to be there.
This is the perfect festive pie for mince pie lovers & haters (but bad for almond haters). This combines a mince pie & a Bakewell – which is a great way to get mince pie haters to love mince pies, or at least a version of a mince pie. This elevates a mince pie from an afternoon snack to a fully fledged dessert when served warm with heaps of double cream.
This combines an extra short, melt in the mouth shortcrust, sweet mince meat & a buttery frangipane. An unbeatable combo. Speaking of melt in the mouth pastry, I’m gonna share with you the well kept secrets of keeping your pastry as short & crumbly as possible:
Keep it as cold as possible
Handle it as little as possible to stop gluten developing
Name a better way to get into the Christmas spirit than baking (& subsequently eating) a batch of these while watching a Christmas movie.
Frangipane Mince Pies
Makes 12 | 40 mins prep / 30 mins cooking (+2hour min chilling)
Ingredients
Pastry:
175g chilled unsalted butter
250g (+1tbsp) plain flour
1tbsp caster sugar
Pinch of salt
1 egg yolk
2-3tbsp ice cold water
Frangipane:
125g butter, room temp
125g caster sugar
2 eggs, room temp
125g ground almond
30g plain flour
Pies:
12tsp mince meat
Method
Cut the butter for the pastry into cubes, toss with 1tbsp of plain flour and put in the freezer for 5 minutes.
Add the remaining flour, sugar & salt to a food processor & pulse to combine. Add the cold butter and pulse to form a breadcrumb-like texture. (See the note if you are making the pastry by hand)
Add in the egg yolk & blend to combine. Then add the water in small amounts, blending to form a dough that sticks together when squished in your hand. You want to add as little water as possible to reach this stage, so add it in stages.
Tip the dough onto a work surface and kneed very lightly until it just comes together to form a ball. Wrap in cling film and chill for at least 2 hours.
In the meantime, make the frangipane. Beat the butter & sugar together. Then add the eggs 1 at a time, beating well between each addition.
Add the ground almonds and sift in the flour and stir to combine
Preheat your oven to 180°C/160°C fan
Remove the pastry from the fridge & cut in half, return half to the fridge.
Roll the other half out on a lightly floured surface to just under 0.5cm thick. Cut into rings big enough to line your muffin tin.
Push the pastry disks into the tin. Use a small ball of pastry offcuts to push the dough into the bottom of the tin & into the edges. Squish any offcuts together & return to the fridge
Repeat with the other half of dough & any offcuts (don’t re-roll the dough more than once, after this it’ll start to get tough).
Once all 12 holes are lined, start on the filling. Spoon in 1tsp of mince meat into the base of each pastry case & spread to an even layer. Spoon on ~1tbsp of frangipane on top & spread flat (this should be very close to the top of the pastry case)
Bake for 25-30 mins until golden.
Dust with icing sugar & serve warm with heaps of double cream
Note: To make your pastry without a food processer, combine the flour, salt & sugar in a bowl. Add in the ice cold butter and rub with your fingers to form a breadcrumb texture. Add in the egg yolk & stir with a palette knife until combined, then add water in small amounts & stir to form a dough that sticks together when squished.