My Best Ever Breakfast Muffins: Sausage, Bacon, Egg & Cheese Muffins

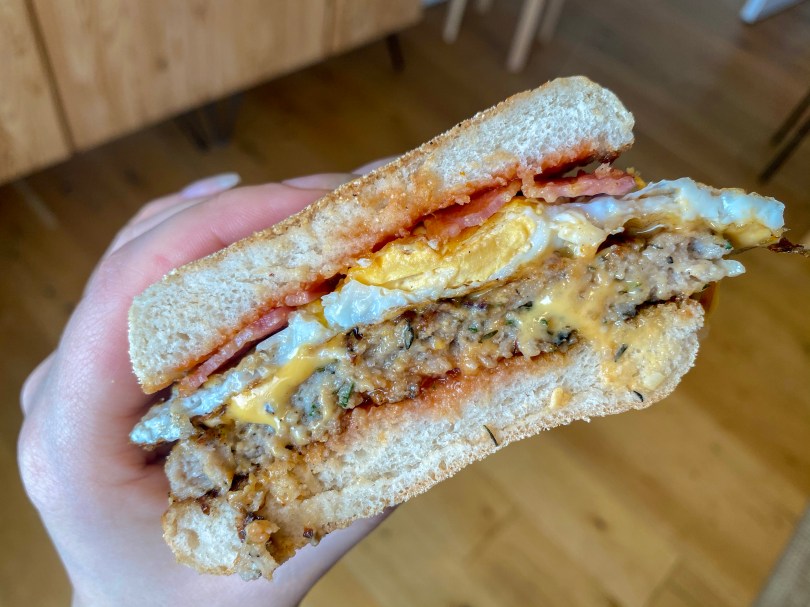
This is the ultimate hangover breakfast. Obviously there are some hangovers where a McDonalds muffin is the only answer, but for those ones where you feel able to get in the kitchen – this is the cure. To be honest this is amazing even if you’re not hungover. Let’s rephrase that first sentence to the ultimate breakfast – big claim but I can back it up. We have a really flavoursome, seasoned sausage patty fried until caramelised with plastic cheese, crispy bacon, fried egg, ketchup (or your sauce of choice, but clearly ketchup is the right one) inside a toasty English muffin. You cannot go wrong! Lots of this muffin is open to editing:

  • Cheese: I love the flavour & melty texture of plastic cheese in a burger or breakfast muffin, bt if you’re not on board switch it for something classier
  • Bacon: smoked, unsmoked, streaky, back – the world’s your oyster
  • Egg: Fry it however you list – sunny side up, over easy (I don’t know what these words mean), runny yolk, hard yolk. I like my eggs flipped with a mostly hard yolk, which may get some hate but eating a sandwich with a runny yolk is just impractical
  • Sauce: Ketchup, brown same, Siracha etc. etc.

Please let me know any different variations you try and how they are!


Sausage, Bacon, Egg & Cheese Breakfast Muffins

Serves 1 | 20 mins cook & prep

Ingredients

Breakfast Sausage Patty:

2 pork sausages (or ~115g sausage meat)

1 clove garlic, minced

2 sage leaves, finely diced (or switch for 1tsp dried sage)

1/2 tsp dried thyme

1/4 tsp soft brown sugar

Large pinch nutmeg

Chilli flakes to taste

Salt &. pepper

Muffins:

2 rashers bacon (streaky or not, smoked or unsmoked – personal preference)

1 egg

1 slice American cheese

English muffin

Ketchup (or sauce of your choice)

Method

  1. Remove the sausages from their casing (skip this if using sausage meat) and combine all the sausage ingredients. Taste for seasoning by frying up a small portion of the meat and adjusting as needed
  2. Cook your bacon – I prefer to do this under a high grill until quite crispy.
  3. Meanwhile, split and toast the english muffin, put this on a plate and spread your choice of sauce on both sides. Set aside ready to assemble.
  4. In a frying pan or skillet heat up enough oil to coat the bottom on medium high heat. While this is heating up, using your hands roll the sausage meat into a ball and press into a thin, even patty in your hands. The patty should be about 1cm thick. It’ll end up being much bigger than the muffin, this is okay as it will shrink when cooked.
  5. Place the patty into the pan and cook for 1-2 mins until the bottom is browned & caramelised. Flip the patty and leave for 30-60seconds, then add the cheese on top. Put a lid or plate over the frying pan and leave for another 30-60 seconds until cooked through (no pink left) and the cheese is melty. Cooking time will depend on the patty thickness, the pan and hob. Place this on the bottom half of the muffin.
  6. If needed, add more oil to the frying pan and crack in an egg. Cook this to your liking (I like mine flipped with the yolk mostly cooked through). Once cooked, add the egg on top of the sausage.
  7. Add the bacon on top, then the other half of the muffin and enjoy!
Korean corn dogs (from Bunsik)

How To Have A Foodie Day in China Town (London)

A few weeks ago my best foodie friend Ros & I spent a very wholesome Saturday wandering around Chinatown + Soho and eating everything we thought looked good. We had a few ideas of stuff we wanted to eat from things we’d seen on instagram, but for the rest we just ate whatever we came across. This was one of my favourite days I’ve had in a long time, it was so nice to walk around and discover new things, and a great way to spend time with one of my favourite people.

Our first stop was one we’d both seen aaaall over Instagram and Tik Tok – Bunsik for Korean corn dogs. We had to see if it was worth the hype. There was a bit of a queue when we got there but it went in no time. We ordered the half and half (£4.8 – half mozz, half sausage corn dog) and the potato mozzarella (£5.9 – full mozzarella corn dog rolled in little potato cubes before frying) and got both topped with ketchup and the spicy mayo. Obviously we had to take some cheese pull videos which I can confirm is a very embarrassing thing to do in the middle of a very busy London. So the verdict: these are absolutely worth the hype. My favourite was the potato mozzarella as I really liked the potato on the outside and I’m not a huge hotdog fan. Ros was more of a fan of the half and half – she preferred the coating and having some hotdog in there. The spicy mayo was the perfect addition too – it gave the perfect amount of kick. If you don’t trust our word, we got food compliments from people walking past. The perfect start to our day, and the perfect hangover cure for me.

Korean corn dogs – back is the half & half, front is the mozzarella potato. Photo by @rosontor (nails by me)

Our next stop was over to Yolkin – a place you might know from their famous macaron ice cream sandwiches. They are absolutely delicious, but not the reason we were there this time. I’d seen on their Instagram a few weeks earlier a creme brulee crepe. We got there and couldn’t see it anywhere on the menu. We left and I immediately searched their insta thinking I’d got the place wrong or it was a temporary special – but no, it was there and no mention of it being temporary. The lovely brave Ros went in and asked, and they had it! Just not on the menu – we felt very VIP ordering a secret item. This came as a cone of crepe, filled with a deliciously thick & creamy custard and a bruleed sugar top (it was hard to photograph, please don’t judge). This was also really incredible – as a person that would happily eat a litre of custard I was very pleased. The crepe was really tender and the sugar added some bitterness and a much needed crunch.

Creme brulee crepe

After this, we thought we should space out the eating by stopping off for a coffee. Ros had spent the morning telling me just how good Vietnamese coffee is so the obvious choice was to head for Vietnamese coffee. Ros googled it and came back with a place called Bahn Mi Keu Deli. We headed here and it turned out to be a place I’d walked past thousands of times and always thought looked great but never went. We’ll definitely be returning to try the food as everything looked amazing. I got an ice coffee and Ros got the drip coffee. I can confirm Ros was not lying, Vietnamese coffee really is incredible. It almost tasted chocolatey! Stopping off for a mid-day drink is one of our top tips for a foodie day to space out the eating a bit and for a toilet break.

Vietnamese iced coffee (& lovely Ros in the back)

Coffee finished, we headed over to Ji Chicken Shop for some popcorn chicken. This place is super cool – you can pick from a huge batch of seasonings to flavour your chicken, anything from matcha to cheese to cumin. We opted for a simple garlic and it was delicious! The chicken was super crispy on the outside & tender on the inside, and really cheap for the amount we got!

Garlic popcorn chicken

We took our chicken and walked over to our next and final destination Old Chang Kee Covent Garden for some curry puffs. This place was on such a busy street but was so empty – it definitely should’ve had queues out the door. We only got the signature chicken curry puff and split it – but since, we’ve both had regrets we didn’t try everything, it all sounded delicious. The puff was heavenly: the curry was creamy rich and so flavoursome, the pastry was so flaky and crispy (I can see why they have the title of the best pastry in London).

Signature Curry Puff, photo by @rosontour

This rounded off our fabulous foodie day, and we really had the loveliest day. We got to eat so much delicious stuff and spend hours chatting. I can’t think of a better way to spend a day! Now for our favourites:

Meg

  1. Curry puff
  2. Corn dogs (specifically potato mozz)
  3. Creme brulee crepe
  4. Popcorn chicken

Ros

  1. Curry Puffs
  2. Corn Dog
  3. Creme brulee crepe
  4. Popcorn chicken

We ended up being exactly the same but my 1 &2 were very close and Ros’ 2 & 3 were very close. That being said, we really recommend everything we had. This is your sign to take your pals and go for a foodie walking day around London! Let me know what you eat in the comments if you do

Cheesy Pork Quesadillas With Avocado Crema

This dish is one of my favourite comfort foods I make. I use a limey, garlicky, coriander-y marinated pork steak, my creamy refried black beans, two types of cheese and fry it up in a tortilla for a delicious meaty cheesy meal – all dipped in a lovely fresh avocado crema. I am the worst (or the best) for overfilling my quesadillas, but I’m not mad becuase it means I end up with this lovely cheesy crust around the outside. If anything, it makes it better. This is a super flavourful, rich but still fresh tasting meal.


Cheesy Pork Quesadillas With Avocado Crema

Serves 2 | 1 hour cooking + prep (+6-24 hours marinating)

Ingredients

Pork:

2 pork loin steaks, chops or shoulder steaks (~240-300g)

Large handful coriander

2 large cloves garlic

Juice & zest of 2 limes

2tbsp white winer vinegar

Salt & Pepper

Beans:

1 400g tin black beans + their juice

2 large cloves garlic minced

Chicken stock pot/cube

2-3tbsp double cream

Avocado Crema:

1 avocado

Juice 1 lime

1 large clove garlic

100ml sour cream or creme fraiche

Quesadillas:

2 large flour tortillas

1/2 white onion diced

60g grated cheddar*

60g low moisture mozzarella grated (see notes)*

*Cheese amounts are not set in stone – please use as much as you’d like

Method

  1. Prepare the pork – you want the pork to be no thicker than 1.5cm. If it is thicker, lay down cling film, lay the pork on top and then another layer of cling film and flatten the pork using a the flat side of a tenderiser or rolling pin to real 1.5cm or less.
  2. Make the marinade for the pork by adding all the ingredients, bar the pork, to a blender and blending until no large lumps are left. Combine the pork and marinate in a bowl or bag and refrigerate for 6-24 hours. Remove the pork from the fridge about an hour before cooking to reach room temperature for more even cooking.
  3. Next up, the refried beans. Heat a splash of olive oil in a small sauce pan over medium heat. Add the garlic and fry until golden.
  4. Add the beans, their liquid, the chicken stock and ~half a tin of water to the pan. Bring to the boil and reduce for 15-20 mins until about 1/3 of the liquid remains. You could reduce for more or less time depending on how thick you like your beans – I like mine a little thinner.
  5. Smash the beans using a potato masher until your desired texture. This is optional, but I like to stir through a little double cream to get a more luxurious texture. If using, add the cream bit by bit, tasting after each addition until it reaches your desired texture and taste. Season to taste with salt and pepper and set aside
  6. Make the avocado crema – add all ingredients to a food processor or blender and blend until smooth. Cover with cling film, you want the cling film to touch the surface to avoid any browning. Set aside in the fridge until ready to use
  7. Now to cook the pork. Coat the bottom of a cast iron (ideally, but other frying pans will work) and heat over medium high heat. Once hot, add the pork steaks. Cook for 2-3 mins each side until cooked through. Be sure to check there is no pinkness left in the middle – cooking time will depend on your hob, pan and steak thickness.
  8. Rest the pork for 5-10 mins under foil, then cut the steak into 1cm cubes.
  9. Now it’s time to assemble the quesadillas. Put a large, dry pan over medium low heat and add the first tortilla. Fill one half of the tortilla as follows: a layer of beans, cheddar, chopped onion, pork, mozzarella. Fold over the tortilla and press down.
  10. Cook until golden brown, flip and cook the other side. A good hint for flipping is to place a plate on top of the frying pan, flip the quesadilla onto the plate then slide it back into the pan.
  11. Repeat to make the second the second quesadilla.
  12. Chop into thirds and serve with the avocado crema for dipping.

Note: In the UK we can’t get blocks of low moisture mozz so we have to use the grated stuff. In this case you’ll need to wash the mozzarella to get rid of the starch (this is used to stop the cheese sticking to itself, but it’ll also stop you getting a nice melt). Put the cheese into a sieve and rinse under cold water until the water runs clear. Spread the cheese in a thin layer onto paper towels and leave to dry.

Sardines with focaccion (Angelina, Dalston)

Angelina – Dalston, E8

Angelina is very often talked about as one of the best restaurants in Hackney, and I’m ashamed to say I spent over a year of my life living just down the road from Angelina and never went. But, over a year on from that flat and I finally took the trip to Angelina, and here I am giving you a review. I went with 2 foodies who you’ve all be introduced to before – my friend Ros and my cousin Bryony – check out their foodie instas linked. We opted for the 10 course tasting menu (made possible by a discount provided by my cousin) on a day we’re now trying, and not succeeding, to rename 10 course Tuesdays. Spoiler alert: it was delicious. Angelina is an Italian-Japanese fusion, which at first scared me a little as I’ve had so many sloppily done fusions, but this was nothing like the others. They blended these two very distinct cuisines absolutely perfectly, which made for such an exciting and sophisticated meal.

Sardines with focaccia and shiso koso (Angelina, Dalston)
Sardines with focaccia and shiso koso

I have to admit I’m still struggling to work out how these dishes formed 10 courses, as we got a lot more than 10 plates. I’m not complaining though! First up we got 3 dishes, which definitely included some of the top dishes of the night: focaccia, sardines & shiso kosho; Hokkaido milk bread, sweet potato & sesame; taleggio, tobiko & moromi. The sardines were one of our favourite of the night, you can’t go wrong with focaccia and a salty fish. The sweet potato dish was like a little katsu sando – really delicious. The taleggio was probably the first taste I got of how flawlessly they had combined Japanese and Italian flavours. It was a little wonton cracker covered in taleggio with fish roe and moromi – I was so impressed with how they balanced the strong cheesy flavour with a much lighter, Japanese flavour. It was perfectly balanced.

Next up was the chawanmushi, clam & bresaola. This was a polarising dish on our table. It is a steamed, set egg custard topped with clams and little bresaola chunks. I really enjoyed how silky it was and the bresaola added a lovely saltiness.

Chawanmushi with clams and bresaola (Angelina, Dalston)
Chawanmushi, clam & bresaola

After this we had our raw course, consisting of 4 dishes. My favourite of this set was the sea bream ceviche with ponzu and sea purslane. The fish was buttery soft. In this course we also got a radicchio salad with smoked burrata and pistachio – this was really amazing. I’d never had a smoked burrata before but it was such an interesting flavour – it was strong and smokey but really light and creamy at the same time. We also had oyster with pomegranate and shiso. I’m a huge oyster fan so loved this, it was very fresh tasting. Lastly we go the sea trout with crispy spinach crackers and caviar. This took the form of almost a tare tare that we spooned onto the crackers. Again delicious, although I found the crackers a little oily.

Next we had our fried courses consisting of monkfish skewers with pickles, and kalettes with tentsuyu. The monkfish was great – super meaty fish, perfectly cooked and crispy on the outside with some sharp pickles to cut through the rich fish. Kalette is a relative of the sprout, which I am known to hate, however I loved the kalettes (or at least I love kalettes cooked like this). They were tempura served with the tentsuyu which is a kind of salty sharp dipping sauce.

We moved onto our pasta course of fazzoletti, wild garlic and walnut which was absolutely incredible. I didn’t feel too much of the Japanese fusion here, but it was a really fantastic plate of pasta. So buttery and garlicky, with the crunch from the walnuts.

Fazoletti with wild garlic and walnut (Angelina, Dalston)
Fazoletti with wild garlic and walnut

For main we had short rib with celeriac and gremolata. The short rib was rich and meaty, which paired perfectly with the buttery celeriac puree and fresh gremolata. We found the short rib a little tough, but we went on the first night of the new menu so I imagine they were still ironing out a few kinks

Short rib with celeriac and gremolata (Angelina, Dalston)
w

Lastly dessert, which I always think is the great test of a restaurant. Lots of restaurants put out amazing savoury dishes but really fall down at the dessert – I’m happy to confirm Angelina is not one of those restaurants. The dessert was listed on the menu as rhubarb, blood orange and nori. A very simple name but the dish was a little more complex: vanilla creme anglais, poached rhubarb, blood orange sorbet, caramelised nori and this delicious crumble type thing. The nori was the really striking thing about this dish – you can tell it’s nori, but it has a sweetness to it which went so well with the sharp fruit flavours. A perfectly balanced dish, yet again.

Creme anglais rhubarb blood orange and nori (Angelina, Dalston)
Creme anglais rhubarb blood orange and nori (photo credit @rosontour)

This meal was such an amazing experience for all of us. We had dishes and flavour combinations we’d never tried before but all of it worked so well. As dubious as I was about a successful Japanese/Italian fusion, I’ve really been converted. The dishes all worked so well, I’m so impressed by the inventiveness of the chefs. I really recommend this restaurant as a great special occasion place (or just to anyone looking to recreate 10 course Tuesday). The 10 course menu costs £59 at full price. They also offer a 5 course tasting menu too for £39!

Find them at 56 Dalston Ln, London E8 3AH.

Pasta Puttanesca

Puttanesca (-esque) Sauce

I learnt about this sauce from the Series of Unfortunate Events movie (IYKYK) and I’ve never looked back. Its a super salty, umami, rich tomatoey sauce – it really packs a punch without feeling too heavy. This is such a great go to weeknight dinner, sped up even more by using a frozen batch of my marinara. I always have a stock of this in my freezer as it can be adapted for so many dishes, and having the sauce ready knocks a good 20 mins off cooking times. This is another of my 15 minute pasta dishes where the sauce is prepped & cooked in the time it takes the pasta to cook. I’ve called this puttaensca-esque as I’ve included tuna which the original doesn’t – I love the addition of tuna for some extra fishiness and protein which keeps me fuller longer.


Putanesca (-esque) Sauce

Serves 1 | 15 mins prep + cook

Ingredients

100g fusilli or other short pasta (or 75g if you aren’t very hungry like me 95% of the time)

1 large clove garlic, thinly sliced

3 jarred/tinned anchovy fillets

1/2 tin tuna (drained)

1/4 batch of my marinara sauce

35g black olives roughly chopped

1tbsp capers

Sprinkle of chilli flakes, to taste

Handful parsley finely chopped

Squeeze of lemon to taste

Parmesan to serve

Method

  1. Cook the pasta in a heavily salted pan of water until al dente.
  2. Meanwhile, heat a splash of olive oil in a frying pan over medium high heat. Add the anchovies and fry, stirring often, until they dissolve into the oil.
  3. Add the garlic and frying until golden. Keep a close eye on this as this will burn quickly. Add the tuna and stir until combined
  4. Reduce the heat to low and add the marinara, capers, olives and chilli flakes (if using). Stir until warmed through. If the sauce is too thick at this point, add some pasta water to reach the desired consistency.
  5. Take off the heat, add salt, pepper and lemon juice to taste. Stir through the parsley (reserve some to serve) and set aside.
  6. Once the pasta is cooked, combine with the sauce and serve with the remaining parsley sprinkled on top and some grated parmesan.
Crabonara (crab carbonara)

Crabonara (Crab Carbonara)

This dish was born out of my mum mishearing carbonara as crabonara – at the time neither of us had any idea that she had just inspired one of my best recipes yet (in my opinion anyway). It really is what it says on the tin – a carbonara but with crab instead of bacon. It’s a super quick dinner, perfect for a week night, that doesn’t skimp on quality or flavour. It really is a 15 minute meal – everything can be prepped while the pasta cooks. It’s creamy and rich like a carbonara, but with the delicate saltiness of crab instead of the salty punch from pancetta. 2 different but equally delicious meals. This version is a lot less rich than my Perfect Carbonara as it uses only the 1 egg per person, making it a bit more suitable for an everyday meal.


Crabonara

Serves 2 | 15 mins

Ingredients

200g long pasta (spaghetti or linguine work well)

100g mixed crab meat

1 large clove garlic

2 eggs

50g parmesan, grated + more for service

Freshly ground black pepper

Splash of olive oil

Method

  1. Cook the pasta in heavily salted boiling water 2 mins shorter than the packet says
  2. In the meantime, heat up a splash of olive oil in a frying pan over medium heat. Add the garlic and fry until lightly golden. Add the crab and cook, stirring often, until warmed through. Set the pan aside
  3. Beat the eggs with the parmesan in a bowl and add freshly cracked black pepper. Near the end of the pasta cooking time, add 2-3 tablespoons of pasta water to this mix while stirring (this will temper the eggs).
  4. Once the pasta is cooked, transfer it to the frying pan with the crab in. Turn a hob to low heat but keep the pan away from the heat for the moment.
  5. Add the egg mix into the pasta pan, be sure to keep moving the pasta continuously to avoid scrambling the eggs.
  6. Move the pan on and off the heat, stirring continuously until the egg is cooked and a silky sauce has formed (a few mins, depends on your hob). If you think the pasta is too dry add a tablespoon or two of pasta water until it’s your desired consistency.
  7. Serve with more freshly cracked black pepper and grated parmesan.
Pasta Table (Bancone)

Bancone – Golden Square, W1

Just wanted to start off this review by saying this place makes it into my top 5, maybe even top 3, Italian places in London just so you know which direction this review is going in (hint: it’s a good one). I’ve been to Bancone more times than I remember but I keep going back and bringing new people. I’m yet to find a person who didn’t enjoy their meal there. It’s pasta, but done so well, and for a very reasonable price given the quality you’re getting. You could easily get 3 courses of sharer food and wine for under £40 each – I’m always shocked when the bill comes given how full and content I am. There are 2 locations, Golden Square and Covent Garden, I’ve been to both and the food is equally good. I generally find it easier to get bookings at Golden Square as it’s bigger and they have a tree in the middle of the room which is fun. But I also really love the booths and the vibe at Covent Garden. All the more reason to go to Bancone twice to try each location!

Starting with drinks and this time I didn’t get a whiskey sour! Instead we went for a 500ml carafe of rose – it was on the only one on their menu and was a really delicious, light rose. Now, this trip was with 2 Bancone lovers (my friend Ros who featured in my B.A.M post, and another friend Maisie) and we have a strategy at Bancone: we limit our starter orders to leave as much room as possible for the pasta (the best things on the menu), but obviously we can’t skip the starters completely. This time we got the focaccia with tomatoes, and burrata with pumpkin. Both were absolutely delicious, and went perfectly together. The burrata was beautifully creamy and paired so well with the pumpkin and crunchy walnuts. And the focaccia was perfect for soaking up any burrata left on the plate (no cheese waste allowed).

Burst open burrata with pumpkin (Bancone)
Had to get in a burrata cut open pic

For mains, we went for 4 pastas and shared. Our two staples that we always get are the bucatini cacio e pepe and the silk handkerchiefs with walnut butter and confit egg yolks. First, the cacio e pepe is easily one of the best examples of a cacio e pepe I’ve ever had – super cheesey, creamy & peppery. And the silk handkerchiefs, this dish has long been a contender for my all time favourite pasta dish. It’s made of sheets of pasta with a gorgeously rich walnut butter that is absolutely indescribable, and if that wasn’t enough it’s topped with a confit egg yolk that you can burst over the pasta. If you only ever listen to one of my recommendations, this pasta should be it.

After the 2 staples, we get another 2 dishes & usually like to try any new additions to the menu. This time we got the courgette, lemon and ricotta ravioli with semi dried tomato butter, and the braised ox cheek pappardelle with Barolo vinegar. Both were absolutely delicious. The ravioli ended up being one of our favourites as the lemon added a real freshness (even with the butter sauce). On the other side, the ox cheek was deliciously rich with a slightly chewy pappardelle – absolutely perfect. The universal favourite is always the silk handkerchiefs, but the ravioli was a real unexpected highlight of the meal. It doesn’t quite take the top spot, but it added such a lovely freshness to an otherwise very rich and buttery meal. Somehow after all this we still weren’t full and after a long debate about whether to get more pasta, we decided against it and opted for an Udderlicious sundae (mine had malt and malteser ice cream, caramel, caramelised hazelnuts and whipped cream if you were wondering).

Every dish we had was just as amazing as the last – and I’m sure that’s true of the whole menu. Bancone never fails to impress me and the standard has never slipped. I really recommend this place for a dinner that feels really high end but at a lower price. It’s also a great place to take visiting parents to impress them (mine will confirm). Let me know in the comments if you’ve ever been/if you do go! Especially if you try the silk handkerchiefs.

Find them at Golden Square 8-10 Lower James Street W1F 9EL, or Covent Garden 39 William IV Street WC2N 4DD.

Steak sandwich with onion, goats cheese and salsa verde

Steak Sandwiches With Goats Cheese, Onions & Salsa Verde

I absolutely love steak sandwiches because I think it opens up the space to be really inventive with a steak. Steak and good bread is such a good base for almost any flavourings, but my personal favourite is this combo with salsa verde, caramelised onions and goats cheese. The onions and steak are both buttery rich, and the salsa verde cuts through that perfectly. For me, goats cheese is the perfect pairing as it adds the soft, creamy texture the sandwich needs but with an added tang. I know goats cheese can be a bit controversial, but I absolutely love it and stand by its use in this sandwich (that being said if you want to sub it for another soft cheese or good mayo I won’t be offended, as long as you let me know how it goes). I’ve also added my top tips for cooking a good steak at the end – not to toot my own horn but I really think I’ve mastered the perfect steak. I get mine caramelised on the outside with loads of butter and garlic, but still pink on the inside. All in all this sandwich really feels like a proper treat dinner – each component is delicious, well made and perfectly balanced.


Steak Sandwiches With Goats Cheese, Onions & Salsa Verde

Serves 2 | 45 mins prep + cooking

Ingredients

2 steaks of your choice or ~500g (I usually go for ribeye – good marbling)

2 white onions

1tbsp olive oil

3tbsp butter

1 batch of my salsa verde

2 large cloves garlic, peeled and squished

60g goats cheese

Ciabatta loaf (or bread of your choice)

Vegetable oil, to cook the steak

Method

  1. A couple of hours before you want to start cooking, remove your steak from the fridge, pat dry with kitchen towel and leave it out to dry and get to room temperature. This will allow you to get a good caramelisation on the steak when you cook it.
  2. Cut off the top & bottom of the onions, peel & chop in half. Finely slice the onions into half moons from side to side, not from top to bottom as this will caramelise better.
  3. Add the olive oil & 1tbsp of the butter to a saucepan and melt over a medium to low heat. When the butter has melted, add in the onions and a big pinch of salt. Stir to coat and put on a lid. Leave this to cook, stirring regularly, for~30mins until soft, jammy and caramelised.
  4. Once the onions are nearly cooked, it’s time to start the steak. Cover the bottom of a cast iron (or other) frying pan with a layer of vegetable oil and heat on high heat until smoking hot. Pat the steak dry one more time, then rub all over with olive oil. Right before you’re ready to add the steak to the pan season both sides generously with salt and pepper.
  5. Add the steaks to the pan, and allow to cook undisturbed for 1-3 minutes. Cooking time will be really variable depending on how you like your steak cooked, the thickness of the steak and your hob. Once cooked to your liking on one side, flip the steaks and add 2 tbsp butter and the garlic. The butter will foam up – use this to baste your steaks for the remaining cooking time.
  6. Once the steaks are cooked, transfer to a chopping board & place the garlic on top. Cover with foil & rest for ~10 mins.
  7. Split the bread in half and toast each side in a dry pan until golden.
  8. Now for assembly, first thinly slice the steak against the grain. Spread the goats cheese on the bottom layer of the bread, top this with the sliced steak and onions. Spread salsa verde on the top layer of the bread and close the sandwich. I like to serve my sandwiches wrapped in foil to prevent structural failure while eating.

My Top Tips for Cooking a Good Steak (from lots of trial and error)

  • Always leave the steak to reach room temperature before cooking
  • Always make sure the steak is very dry before cooking to allow caramelisation to form. Do this by patting with kitchen towel & leaving out before cooking to air dry.
  • Only salt the steak just before cooking, as the salt will draw out moisture undoing all the good drying work you’ve done.
  • Cover the whole base of the pan in oil and leave to get ripping hot before adding the steak. This will allow a caramelised crust to form on the steak
  • If you have a thick fat layer, you’ll need to render this. Using tongues, hold the steak fat side down for about a minute until golden and crispy. Then continue with the cooking process above.
  • Don’t move the steak until it’s time to flip again to allow a good caramelised crust to form.
  • Add butter, garlic & herbs after the first flip and baste to get that flavour into the steak.
  • Rest for about 10mins after cooking, this way the steak will soak up all the juices it releases and stay really moist.
  • Cut against the grain, this will make it easier to bit through in sandwich form.
Salsa Verde

Basics By Meg: Salsa Verde

Next up in the basics series we have this beautifully fresh and salty condiment, made of fresh herbs, garlic, salty capers and anchovies, all bound with some extra virgin olive oil. This is the perfect addition to any rich, fatty dish as it cuts right through the richness, leaving you with a very fresh feeling dish. I use this a lot with pork belly, for example in my Porchetta style sandwiches, as it really complements the fatty meat. It’s also really beautiful served with some fresh white fish, like a sea-bass, or even just on toast. It really is a very versatile sauce that can elevate your dish – hence why I feel it deserves a spot on the basics list.


Salsa Verde

Serves 2 large portions/4 small | 10 mins prep

Ingredients

Large handful parsley

Large handful basil

Small handful mint

1 large garlic clove

4-6 tinned anchovy fillets

1tbsp capers

3tbsp extra virgin olive oil

1tsp red wine vinegar

Method

  1. This is all prepped on one board. Start by mincing the garlic, anchovies & capers on a chopping board. I like to use a cleaver for this as it makes life a lot easier in future for folding the ingredients in on themselves. Push the garlic/caper/anchovy mix to one side.
  2. On the same board, roughly chop the herbs then add in the garlic, capers and anchovies. Now go to town chopping. Regularly scrape the mix in and fold it on top of itself. Keep chopping until everything is very fine & evenly sized.
  3. Transfer this mix to a bowl and stir in the oil and vinegar. Taste this for seasoning – add more vinegar, oil or salt to taste.
Wedding cake sample

How To Host A Wedding Cake Tasting

As my friends’ and family’s resident baker, I’ve now been drafted for 3 wedding cakes, having never done one before… The first one is for my cousin & her fiancé in May, so of course we needed to do a cake tasting to decide the flavours. For context, my cousin is also a major foodie & definitely a big part of why I now am so obsessed with food – check out her insta @bees.eats if you need proof. I asked them for a list of flavours they might like and they sent these criteria:

  1. Chocolate tier: plain choc or with a salted/miso caramel/something salty, also pistachio
  2. Fruit tier: passionfruit, mango, raspberry, lemon & elderflower. No coconut

So I took that brief & made loads of cakes, frostings & fillings that fit the brief (using a trusty spreadsheet to plan the timing because I am that person). I decided not to assemble whole cakes, and instead to lay out all the components to mix & match the flavours. That saves me a lot of time and means we can try more combinations.

Here is the final spread:

Wedding cake tasting
Wedding cake tasting spread
  1. A Vanilla Sponge: I swear by Cupcake Jemma’s recipe – super buttery & moist (sorry), but really holds structure. This recipe, and all other Cupcake Jemma ones mentioned, are in The Cake Book – this is my baking bible & I recommend it to everyone. It has the best basic staple recipes (& lots of exciting cupcake recipes too). I used the raspberry ripple cake recipe but without the raspberry fruit goo. I made 1/2 of the recipe and cooked it in one 20cm tin, which meant I needed to cook it a little longer than the recipe said.
  2. A Chocolate Sponge: Again, I use Cupcake Jemma’s recipe. It’s so fudgy & the perfect level of richness. I used the ridiculous chocolate cake recipe. I made 2/3 of the chocolate cake recipe and cooked it in one 20cm tin. Again I had to cook this a little longer.
  3. Elderflower Simple Syrup: I made my simple syrups by first heating equal parts water & granulated sugar over a medium heat until the sugar dissolved. Leave this to cool, then add elderflower cordial to taste. I use simple syrup to infuse more flavour into the cakes but also to keep them moist (sorry again) while decorating & being stored.
  4. Lemon Simple Syrup: I used the same base syrup as above but added fresh lemon juice to taste.
  5. Passionfruit Simple Syrup: Same as above, but sub the lemon juice for passionfruit juice (push the pulp through a sieve)
  6. Cream Cheese Frosting: I use cupcake Jemma’s recipe for this one again from the book above. I made 1/4 of the recipe.
  7. Lemon & Elderflower Cream Cheese Frosting: For this I used 1/2 of the cream cheese frosting I made (I left half plain) & stirred in elderflower cordial & lemon juice to taste. This does make the frosting a little runny, but it’s absolutely fine for getting the flavour in a tasting where we don’t need the structural support.
  8. Mascarpone Frosting: I used 1/2 this recipe for this frosting. This makes a really rich, creamy filling that’s not too sweet.
  9. Pistachio Mascarpone Frosting: I used 1/2 of the mascarpone frosting I made (& left half plain) & beat in a few teaspoons of pistachio cream (or to taste). Something like this pistachio cream from Sous Chef – I buy mine from Eataly.
  10. Passionfruit Caramel: I used this recipe for caramel which makes a thick caramel sauce, the perfect texture for spreading with an almost bitter taste to it if you cook the sugar until deep amber. I took half of the caramel and stirred through the juice strained from one passionfruit. I absolutely loved this – it was thick & rich, with a kick of passionfruit sharpness. It wasn’t too sweet either I think due to the passionfruit, and that I cooked the sugar until quite a deep colour which gave it a beautiful bitterness.
  11. Miso Caramel: I dissolved ~1tsp of miso in 1tsp of boiling water & stirred this through the remaining half of the caramel. Think highly elevated salted caramel – the miso gives the savoury side to this rich caramel.
  12. Milk, White & Dark Ganache: I used 100g of each with cream in the following ratios. Dark 1:1, Milk 2:1, white 3:1. This Liv for Cake post explains the different ratios needed for each chocolate type and texture needed. I used the runnier ratio as this was just for tasting, but in a cake I’d want a thicker texture.
  13. Crumble: I used Yolanda Gampp’s recipe for this but without the cinnamon. This is the perfect buttery crunch to add some texture to your cake.
  14. Passionfruit & Mango Curd: I ordered this, but will likely make it for the big day. I used Cottage Delight’s Mango & Passionfruit curd which was really great – very tangy and buttery.

I cut the cake into little chunks so we could add whatever syrups, fillings or toppings we wanted to make mini cake bites.

Wedding cake sample
Vanilla cake, mascarpone frosting, passionfruit curd, passionfruit caramel, crumble

After trying a whooole lot of combinations, we decided on 2 flavours, one for each tier. And with special permission from the bride herself, I can tell you the flavours:

  1. Chocolate cake, dark chocolate ganache, miso caramel and crumble
  2. Vanilla cake, passionfruit syrup, mascarpone frosting, passionfruit curd & passionfruit caramel

It surprisingly didn’t take too long to land on these combos – we tasted them and immediately knew that was it. They’re delicious and a bit different to a classic wedding cake. It did mean I ended up with mountains of leftovers, which wasn’t surprising considering just how much of everything I made for only the 3 of us. But, everyone in my office was very grateful when I brought them in – I made a lot of friends that day. Decoration is still TBC, but I’ll make sure to do a post on the final cake. In the meantime, please wish me luck and if you have any tips let me know in the comments please!